- Gear
- Origin Town
- Status Effects
- Dungeons
- Raids
- Kingdoms
- Guilds
- Glossary
- Contributors, credits and thanks
- Annexes
Gear bonus
Dual-wielding
Note: This section purposefully ignores "negative boni" (e.g.: XP on the Ring of Restraint, Broken equipment, ...).
Example
When dual-wielding gear with boni, the dual-wielding penalty is applied to both weapons. However, dual-wielding two weapons with the same boni always yields slightly more than wielding only one of the weapons.
Let B be the bonus given by the weapon.
We express that bonus not as 1.5x, but rather as 0.5x more.
For instance, a Godforged (GF) Questing Staff increases Orn gains by 57.5%, so we would have B = 0.575.
If we have a single GF Questing Staff equipped without dual-wielding another weapon, our total multiplier is:
\[ \text{multiplier}_{\text{single-wield}}\ = (1 + B) = 1.575 \]
If we dual-wield GF Questing Staves, we have a 35% penalty applied to each weapon. The multiplier for a single GF Questing Staff when dual-wielding (e.g.: GF Questing Staff in the left hand and an Arisen Kaladanda in the right hand) is thus:
\[ \text{multiplier}_{\text{questing-staff-dual-wield}}\ = (1 + 0.65 * B) = (1 + 0.65 * 0.575) = 1.37375 \]
This is to be expected; the penalty of dual-wielding reduces our bonus. If however we dual-wield 2 GF Questing Staves, our multiplier above is applied twice (once for each staff), leading to the following:
\[ \text{multiplier}_{\text{2-questing-staves}} \ =\ \text{multiplier} _{\text{questing-staff-dual-wield}}\ ^{2} \ =\ 1.37375^{2} \ = 1.8871890625 \]
A single GF Questing Staff increases our Orn gains by 57.5%, while dual-wielding 2 increases our Orn gains by ~88.72%.
Generic case
Let us consider B the bonus as described in the above section.
With 1 weapon, we have the following multiplier:
\[ \text{multiplier}_{\text{single-wield}}\ = (1 + B) \]
When dual-wielding 2 weapons with the same bonus, we have the following multiplier:
\[ \text{multiplier}_{\text{dual-wield}}\ = (1 + 0.65 * B)^{2} \]
The ratio between single-wielding and dual-wielding can be expressed as:
\[ \text{dual-wield-ratio}
= \frac{\text{multiplier} _{\text{dual-wield}}}{\text{multiplier} _{\text{single-wield}}}
= \frac{(1 + 0.65 * B)^{2}}{1 + B} \]
We can ask Wolframalpha for an interactive plot of this function over B.
A static plot of it (with matplotlib) is available below.

This plot shows the ratio can be read as:
If I dual-wield 2 copies of my weapon, how much more would I gain compared to only using one of the weapon?
Note that it does NOT compare dual-wielding with not having a bonus weapon at all.
To use the chart, first check the bonus on your weapon.
Let's reuse the GF Questing Staff from the previous section.
Its bonus is 57.5%, which is 0.575.
If we try to read the chart, we can see the y value at x=0.575 is close to 1.20.
We can check this by computing the exact ratio, which would be 1.8871890625/1.575 which is ~1.198.
We can see that the ratio is always superior to 1 (except on 0, but weapons without any bonus are not discussed here), meaning that dual-wielding weapons with boni always yields more rewards than wielding only one.
Hybrid
Orna has four different "kinds" of Hybrid:
- All skills and spells cast will use both your Attack and Magic stats
- Pure Hybrid
- Dynamic Hybrid
- Hybrid Monster (e.g.: Beowulf) / Hybrid Damage (e.g.: Arms / Hands of Selene)
All skills and spells cast will use both your Attack and Magic stats
Instead of just using your Attack or Magic stat, all your skills and spells will use a combination of both of them. Additionally, they will use the average of the Defence and the Resistance of your target. This is not normally relevant, as monsters have the same Defence and Resistance values, but can be important if an enemy has certain buffs (Cerus' Defends) or during a Fomorian Houses event. The following formula replaces the attack or magic stat in the usual damage formula: \( (\text{Attack} + \text{Magic}) * \frac{3}{5} \) (or \( (\text{Attack} + \text{Magic}) / 1.66 \)). If your attack and magic stats are equal, this is roughly a 20% damage increase.
This has no effect at all on skills that are already hybrid, like Beaststrike or Verse. The effects of this are applied directly to the damage formula and cannot be seen in the Status menu.
This changes the damage formula to (note the 4 instead of 2 below def + res to account for the averaging):
\[ \text{damage} = \lfloor ((\text{atk} + \text{mag}) * \frac{3}{5} * \text{stat-multiplier} - \frac{\text{def} + \text{res}}{4}) * \text{damage-multiplier} \rfloor \]
Pure Hybrid
Pure hybrid skills use 2/3 of your attack and 2/3 of your magic stat. The following formula replaces the attack or magic stat in the usual damage formula: \( (\text{atk} + \text{mag}) * \frac{2}{3} \) or \( (\text{atk} + \text{mag}) * 0.6667 \).
The buffs used in the formula depend on whether a skill or a spell is cast.
If a ![]() skill is cast, the game will use the caster's
skill is cast, the game will use the caster's ![]() Attack buffs and the target's
Attack buffs and the target's ![]() Defence buffs.
If a
Defence buffs.
If a ![]() spell is cast, the game will use the caster's
spell is cast, the game will use the caster's ![]() Magic buffs and the target's
Magic buffs and the target's ![]() Resistance buffs.
Resistance buffs.
This changes the damage formula to the following:
\[ \text{damage} = \lfloor ((\text{atk} + \text{mag}) * \frac{2}{3} * \text{stat-multiplier} - \frac{\text{def} + \text{res}}{4}) * \text{damage-multiplier} \rfloor \]
Dynamic Hybrid
We call Dynamic Hybrid all skills or spells that "use either attack or magic, whichever is higher". Sands of Aaru or God classes' Eventualus Apex skills are examples of this.
As the description mentions, these spells replace the Attack or Magic value from the damage formula with whichever stat is the highest. The defensive stat is replaced by the average of the target's Defence and Resistance.
The offensive buffs that are applied depend on whether the ![]() Attack stat or the
Attack stat or the ![]() Magic stat of the caster is the highest.
If the Attack stat is the highest, Attack buffs are used.
Otherwise, Magic buffs are used.
The game does not base this decision on the potential damage output.
If one has
Magic stat of the caster is the highest.
If the Attack stat is the highest, Attack buffs are used.
Otherwise, Magic buffs are used.
The game does not base this decision on the potential damage output.
If one has ![]() 1000 and
1000 and ![]() 1001, the Magic buffs are chosen, even if the caster has the following buffs:
1001, the Magic buffs are chosen, even if the caster has the following buffs: ![]()
![]()
![]()
![]()
![]()
![]() .
.
The defensive buffs used in the formula depend on whether a skill or a spell is cast.
If a ![]() skill is cast, the game will use the target's
skill is cast, the game will use the target's ![]() Defence buffs.
If a
Defence buffs.
If a ![]() spell is cast, the game will use the target's
spell is cast, the game will use the target's ![]() Resistance buffs.
Resistance buffs.
This changes the damage formula to the following:
\[ \text{damage} = \lfloor (\text{max} (\text{atk} , \text{mag}) * \text{stat-multiplier} - \frac{\text{def}+\text{res}}{4}) * \text{damage-multiplier} \rfloor \]
Hybrid Monster (e.g.: Beowulf) / Hybrid Damage (e.g.: Arms / Hands of Selene)
This refers to the effects described as "Hybrid damage will be increased by X%".
Contrary to the description, the implementation of this is not a multiplier to the damage of Hybrid skills and spells. It increases your attack stat by X% of your magic stat and your magic stat by X% of your attack stat. Since it changes your raw stats, its effects are visible in the Status menu. This effect stacks additively.
This effect works with other kinds of hybrids and does not change the damage formula for regular skills and spells.
Summary
Let us consider the following genric damage formula:
\[ \text{damage} = \lfloor ({\color{red} \text{O}} * \text{stat-multiplier} - \frac{\text{def} + \text{res}}{4} * {\color{yellow} \text{DB}}) * \text{damage-multiplier} * {\color{green} \text{OB}} \rfloor \]
Where O is the offensive stat and OB / DB the offensive and defensive buffs respectively.
For all hybrid kinds (except Hybrid Monster / Hybrid Damage), we have:
\[ {\color{yellow} \text{defensive-buffs}} = \text{if using } \begin{cases} \text{a skill} \Rightarrow\text{def buffs} \\ \text{a spell} \Rightarrow\text{res buffs} \end{cases} \]
All skills and spells cast will use both your Attack and Magic stats
\[ {\color{red} \text{offensive-stat}} = (\text{atk} + \text{mag}) * \frac{3}{5} \] \[ {\color{green} \text{offensive-buffs}} = \text{if using } \begin{cases} \text{a skill} \Rightarrow\text{atk buffs} \\ \text{a spell} \Rightarrow\text{mag buffs} \end{cases} \]
Pure Hybrid
\[ {\color{red} \text{offensive-stat}} = (\text{atk} + \text{mag}) * \frac{2}{3} \] \[ {\color{green} \text{offensive-buffs}} = \text{if using } \begin{cases} \text{a skill} \Rightarrow\text{atk buffs} \\ \text{a spell} \Rightarrow\text{mag buffs} \end{cases} \]
Dynamic Hybrid Skills
\[ {\color{red} \text{offensive-stat}} = \text{max}(\text{atk}, \text{mag}) \] \[ {\color{green} \text{offensive-buffs}} = \text{if } \begin{cases} \text{atk} > \text{mag} \Rightarrow \text{atk buffs} \\ \text{mag} >= \text{atk} \Rightarrow \text{mag buffs} \end{cases} \]
Unlocks at 25:
- Town Hall, Citadel, Residence
- Wayvessel, Keep
- Shop, Bestiary, Herbalist
- Blacksmith
Unlocks at 50:
- Jeweller, Refinery
Unlocks at 75:
- Grand Market
Unlocks at 100:
- Appraiser
Status effects are changes that affect your character during combat. They can increase or decrease your stats, inflict damage over time, cause death, ... or multiple of those at the same time. One can get a status effect through:
- One of their own spells
- A spell of an enemy
- A spell of a follower
- A spell of an ally, while playing in party mode
- An equipped item
Some status effects are temporary, while some other are permanent. Some effects do have both a temporary and a permanent variation. Temporary status effects have a chance of fading each turn and are usually prefixed by T..
Stats altering status effects
Generic status effects
These status effects raise or lower a player's in-battle stats (attack, magic, defense, resistance, and/or dexterity):
 Defense: Change to the defense stat
 Resistance: Change to the resistance stat
 Attack: Change to the damage a melee skill does (doesn't change the target's attack value)
 Magic: Change to the damage a magical spell does (doesn't change the target's magic value)
 Dexterity: Change to the dexterity stat
 Critical Chance: Change to the chance of dealing a critical strike
 All: Change to all at once
There exists different variations of the above effects, often referred to as "up"/"down", "single"/"double"/"triple" and "temporary"/"permanent". Temporary effects (whether positive or negative) are denoted with purple arrows, permanent positive effects are denoted with green arrows and permanent negative effects are denoted with orange arrows.
The table below describes, for each buff, the alteration percentage for each combination of stat and arrows. Empty cells denote combinations that do not exist and triple question marks (???) combinations that do exist but whose alteration is not known or hasn't yet been contributed.
| Stat(s) altered | ||||||||||
|---|---|---|---|---|---|---|---|---|---|---|
| -100% | -80% | -20% | +25% | +50% | +100% | -20% | -80% | +25% | +50% | |
| ??? | ??? | ??? | ??? | |||||||
| +20% | +100% | |||||||||
| +20% | 50% | +60%* | +20% |
*![]() also grants +10%
also grants +10%![]() (no additional effect on
(no additional effect on ![]() )
)
Individual buff combinations are considered different buffs and stack multiplicatively. This means that ![]() +
+![]() grants a
grants a 1.25*1.5=1.875 factor to defense (+87.5%). However, using different sources for the same buff does not apply the buff twice. For example, if ![]() is granted using either of Magic Boost or Wyvern Speed, casting the other spell will not grant another
is granted using either of Magic Boost or Wyvern Speed, casting the other spell will not grant another ![]() .
.
Gaits
Gaits are a family of buffs that can only be applied to oneself. They are learnt through the following classes:
- T4 Gait of Hildr is learnt by Wolf Tamer at level 90
- T6 Gait of Thrud is learnt by Dragoon / Valkyrie at level 130
- T10 Gaits are learnt by Beowulf / Bestla at levels 225 (Kára and Eir) and 230 (Snotra and Gunnr).
While Gaits are permanent buffs, only one Gait can be active at a time. Casting a Gait spell while another Gait is active will replace the active Gait, as opposed to granting a new status effect. Gaits and Stances can both be applied at the same time (they do not override one another).
Gaits allow their caster to boost some stats at the expense of some others. Below are the Gaits and their effects:
| Tier | Gait | +++ | +++ | --- | --- |
|---|---|---|---|---|---|
| 4 | +10% | +10% | -25% | -25% | |
| 6 | +10% | +10% | -25% | -25% | |
| 10 | +50% | -90% | -90% | ||
| 10 | +50% | -90% | -90% | ||
| 10 | +50% | -90% | -90% | ||
| 10 | +50% | -90% | -90% |
Stances
Stances are a family of Giant buffs that can only be applied to oneself. They are only obtainable through off-hand abilities (on off-hands, dual-wielding or two-handed weapons). The weapons are obtained by defeating bosses and raids summoned by the Celestial Stardrops and Celestial Moondrops respectively (note that these can be used year-round, but only drop during the Of Giants and Titans event).
Much like Gaits, they are permanent but only one can be active at a time. One cannot equip two Stance spells at once in their loadout (since there is only one off-hand ability slot), but it is possible to override a stance in battle dungeons by leaving, changing equipment, then re-entering the dungeon (a useful strategy for endless dungeons). Gaits and Stances can both be applied at the same time (they do not override one another).
| Stance | Tier | Effect |
|---|---|---|
| T6 | +100% | |
| T8 | +30% | |
| T8 | +20% Collateral Damage damage, +10% Collateral Damage chance -20% max ward on Collateral Damage proc | |
| T8 | +20% | |
| T7 | +10% damage, (DoT based on your damage per hit, 5%) | |
| T8 | 25% chance of applying your next buff to a summon |
Miscellaneous effects
| Effect | Description |
|---|---|
| Self buff from Berserk. Increases damage output by 50% at the cost of 5% of max HP per turn. | |
| Self buff from Berserk II. Boosts | |
| Self buff from Berserk III. Boosts | |
| Debuff inflicted by Break. (?) | |
| Nullifies healing. +5% | |
| -50% | |
| Temporary. Increases the chance an enemy targets you in party play. | |
| Temporary. Increases the chance an enemy targets you in party play. | |
| Temporary. Decreases the chance an enemy targets you in party play. | |
| Temporary. Decreases the chance an enemy targets you in party play. |
(31/07/2023): What does "Break" do exactly?
(06/11/2023): How do Target statuses work? What is their fade chance?
Monster only status effects
The Cerus family of raid bosses have two spells named "Defend" that apply a self-buff. One of these applies a ![]() Defending status buff, while the other applies a
Defending status buff, while the other applies a ![]() Defending buff. These buffs increase Cerus' defense or resistance respectively and are permanent. However, much like Gaits, the two buffs cannot be active at the same time and applying one will remove the other.
Defending buff. These buffs increase Cerus' defense or resistance respectively and are permanent. However, much like Gaits, the two buffs cannot be active at the same time and applying one will remove the other.
The Yggdrasil family of raid bosses have two spells, Tree of Life and Tree of Demise which largely add to Yggdrasil's defenses.
What is Defend's stat increase?
What is Tree of Life's stat increase? Weakness? Fade chance?
Status Afflictions
This section details other negative status effects that can be inflicted on an enemy.
Disables and DoTs
Mechanics
-
Disables are status effects which have a chance to prevent the afflicted target from taking their turn. If one uses its turn to use consumable, then it cannot be disabled. All other actions may be disabled.
When one is afflicted by multiple disables, each of them roll separately. This means that disable chances stack multiplicatively.
-
DoTs, standing for Damage over Time are status effects which deal damage every turn.
Status afflictions in this section are either Disables, DoTs, or both at the same time. Most are temporary and have a chance to fade each turn. However, once inflicted, they cannot fade on the next turn the target has. Let us consider the following non-party scenario:
- Player used Stun Dart! Target is stunned.
- Target couldn't attack.
- Player attacked!
- Target attacked! Target is no longer stunned.
Here, on 1., the player stunned the target. The next turn the target has is 2.. On 2., it is not possible for the ![]() Stunned status effect to fade.
Stunned status effect to fade. 4. is the first turn where ![]() Stunned may fade.
Stunned may fade.
In the very specific case of the ![]() Asleep disable and party play, the target may not be woken up even if damaged by entities after being afflicted but before having had their turn (that is, if an entity played in between
Asleep disable and party play, the target may not be woken up even if damaged by entities after being afflicted but before having had their turn (that is, if an entity played in between 1. and 2. in the above scenario).
DoT damage computation.
DoTs deal damage based on the afflicted target's max HP. DoTs are capped by default to 999HP each per turn. This means that a player afflicted with 2 DoTs can take up to 1998 damage per turn. Some player amities or gear (e.g.: Autumna) can alter that cap for either themselves or the entities on which they inflict DoTs.
Sometimes, the default cap is not 999:
- Drakeblight has a cap of 500.
- Starstruck has a cap of 9,999.
- Doom has a cap of 99,999.
- Titans have 25x the regular cap (i.e.: 24,975 as the default cap, 12,500 for Drakeblight, 249,975 for Starstruck and 2,499,975 for Doom).
The formula for HP lost per turn is min(cap, max(1, floor(HPmax*(X/100)) )), with X the % of max health dealt as damage.
Check whether pet damage may proc the Autumna gear. Not just Drakeblight.
Check how Autumna gear affects the cap. Is the cap specific to the enemy? Or per status?
List and effects
In the following table:
- Fade refers to the chance that, at the end of the turn, the effect fades away
- Dmg is the percentage of max HP the target loses per turn (within the cap)
- Miss is the chance that the target misses its turn
| Effect | Fade | Dmg | Miss | Notes |
|---|---|---|---|---|
| 25% | 100% | Target cannot evade an attack They wake up when they take damage from a player / monster / summonThey cannot be woken up this way until they have missed 1 turn at least | ||
| 25% | 2% | Decreases | ||
| 25% | 2% | 25% | ||
| 25% | 50% | 50% miss chance is for attacks or damaging skills/spells to hit only | ||
| 10% | 5% | Decreases the damage from skills and spells by 20% (equivalent to | ||
| 50% | Target may not perform the action they intended, even if they intended to use a consumable They may use a random spell from their loadout or Defend (?) | |||
| 10% | ||||
| 3% | 200%* | Has a 5 turns countdown, damage capped to 99,999 | ||
| 5% | 5% | |||
| 50% | 40% | Target cannot evade an attack | ||
| 10% | 20% | |||
| 25% | 25% | |||
| 20% | 100% | Target cannot evade an attack | ||
| 10% | 2% | |||
| 20% | 3% | Decreases | ||
| 50% | 10%* | Has a 3 turns countdown, damage capped to 9,999 | ||
| 50% | 100% | Target cannot evade an attack | ||
| 50% | 50% | Target cannot evade an attack | ||
| 10% | 10% |
*Damage is dealt each turn once the countdown reaches 0. For instance, a target has 3 turns once inflicted with ![]() Starstruck where they does not take damage. Starting on the 4th turn, they will take 10% damage until the effect fades.
Starstruck where they does not take damage. Starting on the 4th turn, they will take 10% damage until the effect fades.
How often does a Confused target fail to perform their action? How is the new action selected?
Sigils
Blights
Drakeblight is a 1% DoT with a 500 cap (12,500 against Titans). Sometimes causes one to be unable to attack. Seems uninfluenced by Autumna gear. (OL convo)
Miscellaneous effects
| Effect | Details |
|---|---|
| Only available through the Titan's Build Tower spell. Restores 2% of max HP per turn. Temporary. | |
| Given only through Aglovale. Increases Arcane element damage by 50% and causes all Arcane damage to produce blue numbers as though enemies were weak to Arcane. Does not act as a weakness for Ultima or similar spells. Temporary. May have other unknown interactions. | |
| Given only through Tethra. Increases Dragon element damage by 50% and causes all Dragon damage to produce blue numbers as though enemies were weak to Dragon. Does not act as a weakness for Ultima or similar spells. Temporary. May have other unknown interactions. |
Elemental effects
Calls
Dungeons are an activity in which a player explores a monster filled dungeon. One needs to be Tier 3 in order to access them. Dungeons have a certain number of floors which depends on the Tier of the player opening it. Further floors may only be accessed once the previous floor has been completed. At the end of a dungeon, players obtain additional rewards such as materials or other items (oftentimes referred to as EoD/EoG rewards, for End-of-Dungeon/Gauntlet rewards).
There exists 2 kinds of dungeons: Battle Dungeons and Exploration Dungeons.
Battle Dungeons
Battle Dungeons are the original dungeons that were introduced into the game. They feature a fight per floor, which the player must win in order to access the next one. Once the fight has ended, the next one can be immediately started, making Battle Dungeons an efficient way of fighting numerous enemies.
Once the dungeon has started, players have no opportunity to rest. Dungeons can be fled from to change gear/class/pet and re-entered with a new loadout. In this case, Ward/HP/MP may be clamped if the max Ward/HP/MP of the new loadout is lower than the current Ward/HP/MP when the dungeon was last fled from. Also, the enemies on the floor that was currently being fought will be fully healed.
Although one cannot heal between battles (only through healing spells and items if not in Hard mode), status effects do remain from one floor to the next one. There are some exceptions to that such as Doom, which will dissipate when completing a floor. A common strategy which makes heavy use of that is to use the first floor(s) to apply as many buffs as possible, which can be kept until the end of the dungeon, in order to one shot as many floors as possible.
The Battle Dungeon ends when the player has successfully defeated all floors or when the player is defeated. If the player is defeated, no End-of-Dungeon rewards are awarded.
Bosses defeated in a Battle Dungeon only reward 1/4 of their base Gold, Orn and Exp rewards. There is no known reduction for item drops.
Horde dungeons debuff? Needs testing in both Themed and regular dungeons.
Exploration Dungeons
Overview
Exploration Dungeons were released with 3.9.3 on November 29th 2023. They are made available through Mystic Caves and Goblin Fortresses, which are since no longer available as Battle Dungeons.
With Exploration Dungeons, players enter a top-down 2D view of the floor where they can freely move from room to room. Rooms may contain different entities such as monsters, bosses, mineable resource nodes, (Kingdom) Orns / Gold, Kingdom Florens and Materials.
Contrary to Battle Dungeons, the objective for each floor is not always to defeat enemies. It is one of:
- Defeat X monster(s)
- Defeat X boss(es)
- Find the exit (hidden behind a mineable decoration)
- Reveal and activate the 4 floor switches (hidden behind mineable decorations) then proceed to the exit
Exploration Dungeons have much fewer floors than Battle Dungeons, but each takes much longer to be completed.
Exploration Dungeons also reward 5 End-of-Dungeon rewards and have no fight rewards reduction for bosses as Battle Dungeons do.
Mining
Mining is the activity exclusive to Exploration Dungeons. This can either be done by manually tapping the resource nodes or the pickaxe to the bottom-left of the UI. If the pickaxe is held down, the character will walk from one resource node to the other and automatically mine them. If the pickaxe is repeteadly tapped, the mine animation will be interrupted but still completed, meaning it is very slightly faster than holding down. Once there is no longer any resource node in the room, the pickaxe will be greyed out.
If using the pickaxe, it may happen that the character stucks itself looping over 2 tiles. If that happens, the pickaxe must be released until the character stops on a tile and then re-tapped. Also, there may be resource nodes in out-of-reach places for the character. While they are in the room, the pickaxe will not go grey, but the character will not move when tapping it. The resource nodes must be mined by tapping on them directly.
When mining, the character gathers remnants of resource nodes, which can later be exchanged for Deep Shards. The process is explained here. Mining is also sometimes required to progress further into the dungeon, to uncover the exit or the floor switches.
Fighting
Monsters and bosses roam the floors of the dungeons. They may appear in any room which is not in the bottom-most row. They can be fought by tapping them (short or long, as on the overworld). This starts the battle as it would in the overworld.
Unlike with Battle Dungeons, no status effect carries from one fight to the other. The character also starts each fight with full health and mana. Being defeated in an Exploration Dungeon does not end the run as it would with Battle Dungeons. Instead, the fight is stopped and the game returns to the floor view, where the player can re-try the fight as many times as they want (starting with full HP/MP), until the Dungeon timer expires.
The last floor of a dungeon always has 2 rooms only: the starting room and a single boss in the room immediately up, which must be defeated to complete the Dungeon. When defeating it, the rewards screen will show up both the fight reward and Dungeon completion rewards.
Gathering pickups
Any room in any floor has a chance of containing one or more pickups. They can be collected by tapping once on them.
These pickups may contain:
- Kingdom Gold
- Kingdom Orns
- Kingdom Florens (~80-120)
- Gold
- Orns
- A random material (10-20)
Prior to tapping on them, there is no way of knowing if a gold/orn pickup is personal Gold/Orns or Kingdom Gold/Orns.
UI
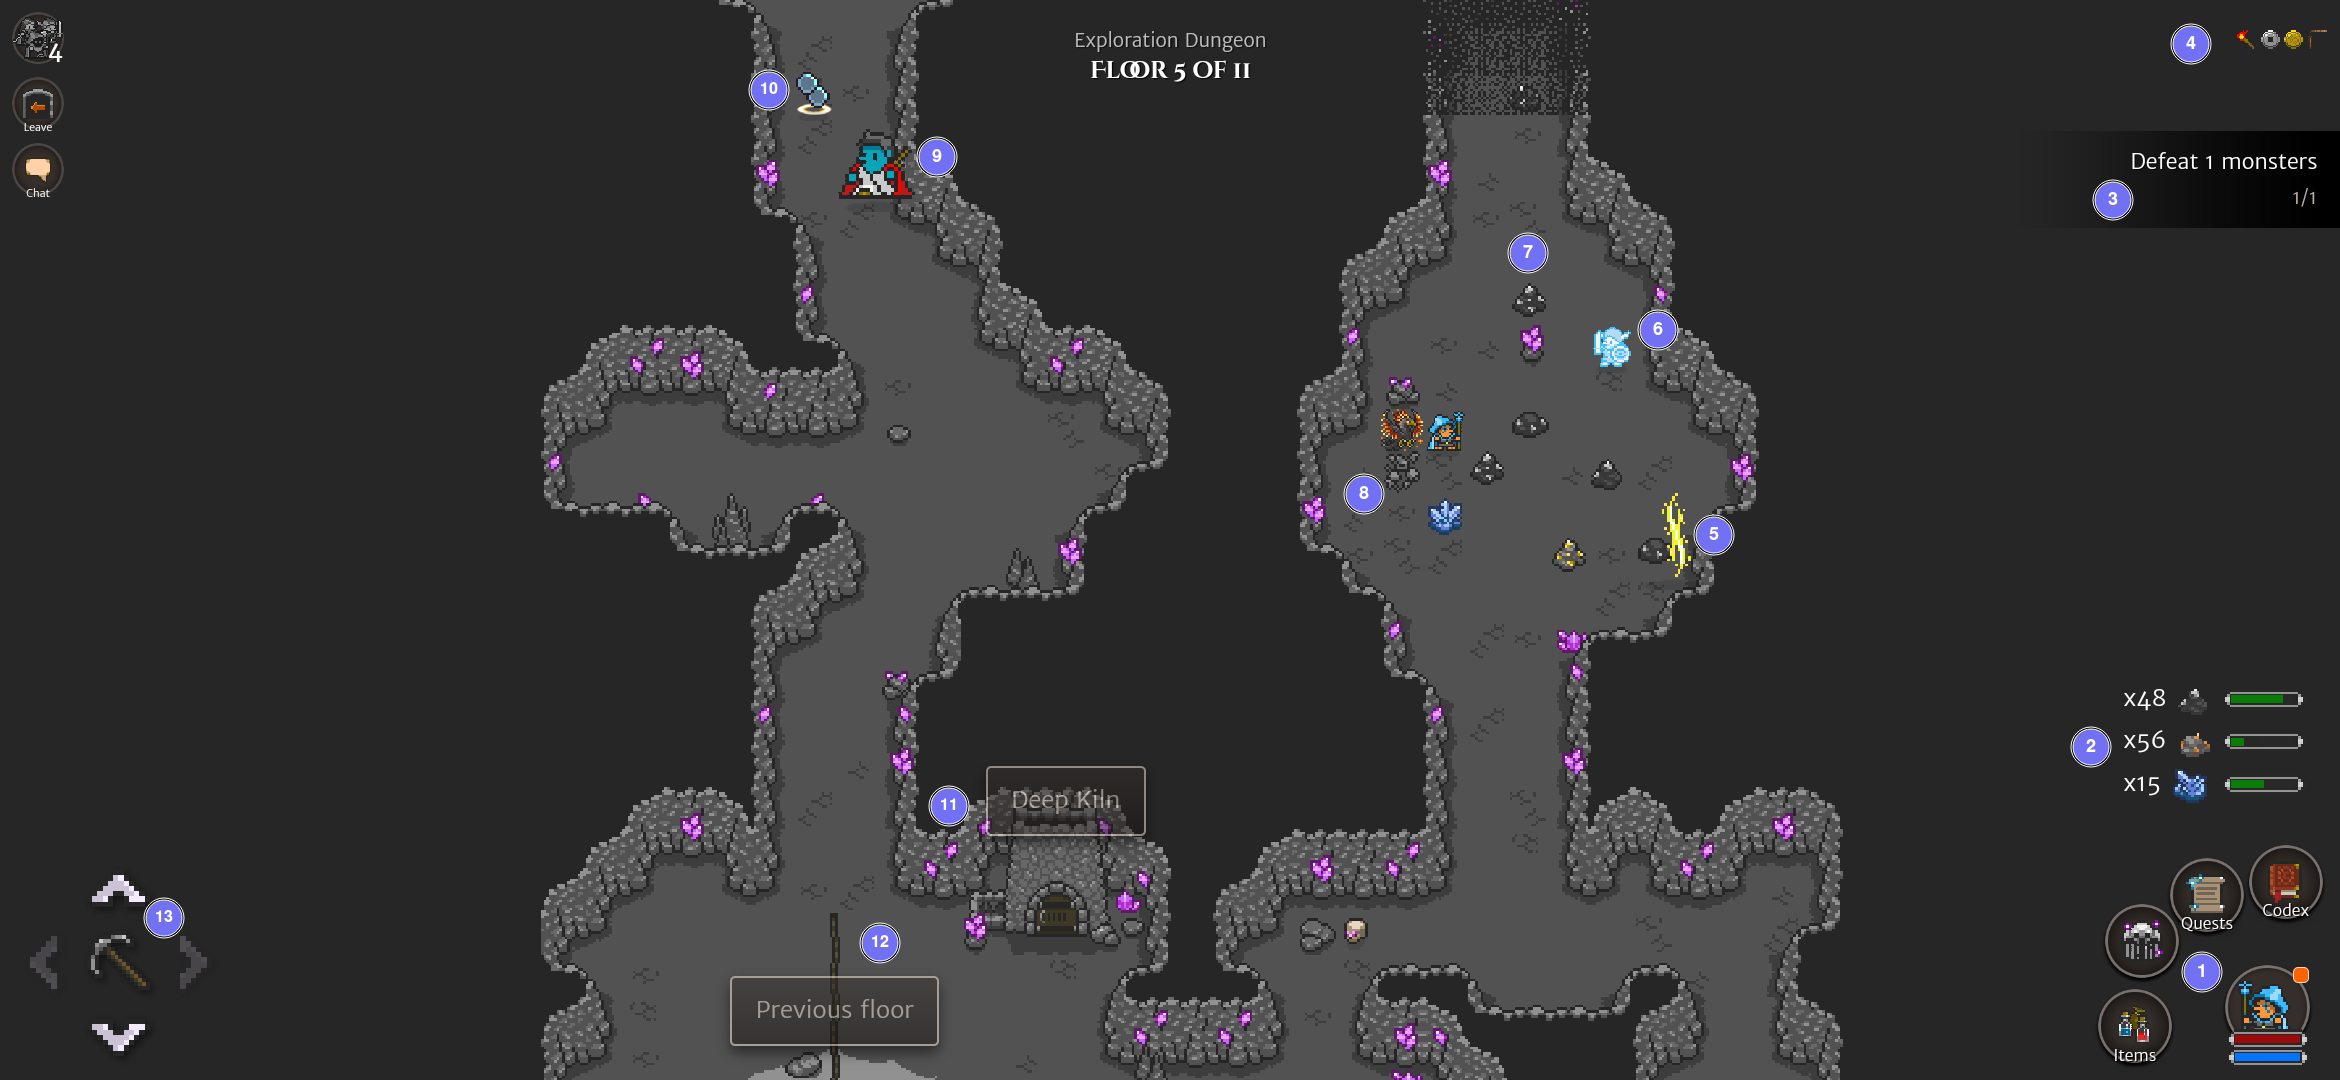
- Quick-access buttons (Codex, Quests, Map, Items). The Map button displays a layout of the floor as seen in Floor Layout.
- The resources collected. Here, they are from top to bottom the 10:1, 5:1 and 2:1 resources respectively. The green bar shows the progress to the next Deep Shard (80%, 20%, 50% respectively).
- The floor quest. Completing it will reveal the portal to the next floor.
- Active buffs.
- The portal to the next floor. On floors with the 4 switches quest, there is no portal but a dedicated room with the path to the next floor.
- A monster (Lost Memory).
- A resource node.
- A mined resource node.
- A boss (Enlightened Prince). Like on the overworld, bosses appear larger than monsters.
- An Orns or Kingdom Orns pickup.
- The Deep Kiln in the starting room, to smelt resources into Deep Shards.
- Path to the previous floor in the starting room.
- The directional pad to move from room to room and the pickaxe to direct the character to move and mine a resource node. Direction to which the player can go have white arrows, while those to which they cannot have greyed arrows.
Floor layout
The layout of a floor can be seen as a grid of size at least 1x3 and at most 4x5. Not all cells have to have a room.
Players start in one room on the bottom row of the floor. Rooms on the bottom row often but not always branch up. They may also branch sideways.
Once we go up from a room in the bottom row (if there is a path), there will be other rooms until we reach the top-most row of the floor. If there is a free space to the left or right of the room, there is a low chance that a room can be hidden there. It is sometimes needed to find it if the exit or a floor switch is located there.
Most floors will have a W shaped pattern, with a bottom row of rooms all having upwards rooms.
Here are some examples of layouts:
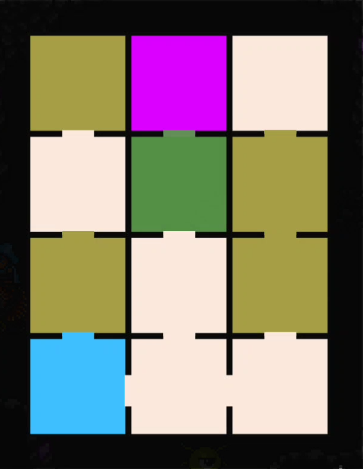


The color of the squares indicate what the room contains:
- White: Nothing noteworthy.
- Blue: The starting room.
- Yellow: A room containing a portal or one or more floor switches.
- Green: The room where the player is.
- Purple: In the "Find 4 floor switches" floors, this is where the path to the next floor is.
If the player (green) is on a colored room, the room will be shown half of that color and half green.
Mining for Deep Shards
The count of which resources were mined is stored and shown at the bottom-right of the UI. There are, for each Exploration Dungeons, 3 different kinds of resources. They can be smelt at the Deep Kiln, located in the starting room of each floor. Since resources are kept when progressing the dungeon, they can be all smelt on the last floor. However, if they are not smelt when the dungeon expires, they are lost and the player gets no Deep Shard from the exploration. Similarly, if there are leftovers resources that cannot be smelt into 1 Deep Shard, those are lost when the dungeon expires.
The ratio of resource-to-shards is not 1:1 and depends on the kind of resource. It can be 10:1, 5:1 or 2:1.
Cooldown and party-play
Exploration Dungeons interact uniquely with party-play. There is no dedicated button to open the exploration to the party as there is to invite the party in a Battle Dungeon. Instead, the exploration is open to everyone in the party. Once opened and until the cooldown is over, players in the party can freely join the exploration. Rewards for party-play exploration are however not duplicated for each member in the exploration (fights, mining, ...). For instance, players are unable to pick up a resource that was already picked up by another player. This creates a "race" between players where the progress of one hinders the progress of others.
Since everyone in a party can join an exploration, the cooldown of an Exploration Dungeon is not tied to the player, but to the party leader. This implies the following:
- Opening an Exploration Dungeon at a Wayvessel spot prevents other players from opening the dungeon themselves. If the player opening has no Unfelled Concord, they would lock the entire party (including players joining after the dungeon has been opened) from opening the dungeon again for 6 hours.
- The same Exploration Dungeon can be run multiple times within a 1-hour timeframe if using different party leaders (which may be alts).
The latter point can be used to farm Orns, End-of-Dungeon items (at high quality) and Deep Shards effectively. The method has been explained by Knight411 in the Orna Legends Discord server. It summarizes to the following:
- Equip your best Orn gear and max your Anguish
- Get physically close to a
 Goblin Fortress (
 Wayvessels do not work)
 - Run the dungeon and kill every Elite Kobold Lord, Elite Orc Lord and Kobold Lord that you can. These are the fights that reward with the most Orns.
- Don't forget to visit the Deep Kiln!
- Join an alt party where your alt is the party leader. The party leader has changed, your dungeon is off cooldown. Rinse and repeat.
You'll need to cycle through multiple alts, so that you don't re-use the same alt within a dungeon cooldown timeframe.
Finding dungeons
The main source of dungeons is the world map, where they can be found as buildings. They do not move, nor do they disappear. They may appear randomly, as can any other building. They cannot be built by players. They appear on the "Show dungeons" or "Show dungeons & towers" layer of the map.
Other means of running dungeons are:
- Through a Wayvessel, running dungeons accessible from the remote Wayvessel.
- In the Fortress / Castle, which have one dungeon that can be opened only by the Fortress / Castle owner (note: the Keep does not have a dungeon).
- In the main menu, using the Menu Gauntlet (note: this dungeon is personal and cannot be run with the party).
It is common for people to "share" their dungeon spots. They create another account whose purpose is to build a Wayvessel in reach of a maximum of dungeons and to invite others to come to their Wayvessel to run dungeons. Some Discord servers have that kind of service available, and Kingdoms usually have their own member-restricted system.
Themed dungeons
There exists multiple dungeon themes, which change what families of monsters can be encountered in the dungeon. Dungeon themes rotate for existing dungeons every week at Monday 00:00UTC. At that time, each dungeon's theme is rolled for the next week (it may happen that a dungeon keeps the same theme for 2 weeks in a row). Not all themes weigh equally in the roll and some dungeons are rarer than others.
Each theme requires the player to be at least a certain Tier in order to view them.
If the player does not meet that Tier requirement, they will see the dungeon as a regular one.
For example, ![]() Valleys of the Gods require the player to have reach T10. Where a Valley stands, a T9 or less player will see a
Valleys of the Gods require the player to have reach T10. Where a Valley stands, a T9 or less player will see a ![]() regular dungeon.
regular dungeon.
The full list of themes can be found on the playorna website.
While Regular Dungeons have tiers set to each floor where an enemy of that tier will appear, Themed Dungeons work differently. Players can only encounter monsters of their Tier or below in Themed Dungeons. The level of enemies of lower Tiers will be scaled up to match the Tier of the player. For example, when encountering a T1 Goblin Lord at T10, its level will be in the T10 range.
Battle Dungeons
Menu Gauntlet
The Menu Gauntlet, also sometimes called the "Personal Gauntlet", is a Dungeon that is available for players upon reaching T3. It can be accessed from the Menu under the "Dungeon" tab. Note that this is the only Dungeon to have been called a Gauntlet, although the term is often used interchangeably within the community.
It behaves much like a Regular Dungeon, with the following differences:
- It cannot be run Horde mode.
- It cannot be run with a party (only the player can enter)
- The cooldown for it are greatly reduced
Regular dungeons 
Regular dungeons are the most common ones.
They may contain any monster in the game as long as it doesn't belong to an inactive event (e.g.: Follower of Kerberos outside of Beastfelled) or is locked to a specific dungeon theme (e.g.: Glatisant, only found in ![]() Dragon Roosts).
They do not have any specific reward boost upon completion.
Dragon Roosts).
They do not have any specific reward boost upon completion.
Regular dungeons offer the best balance for farming content.
Beast Dens 
Beast Dens are available starting Tier 3. They contain only monsters in the Animal family. They reward additional Orns upon completion.
They have boss floors which, even if the dungeon was run non-horde mode, will contain multiple enemies.
Farming them is a great way to stock up on Hardened Steel. Running them Hard-Horde is also a great way of piling Orns up. Most of the time, people do not bother too much about them because the drops from the monsters are not noteworthy.
During the Beastfelled (formerly known as Rise/Return of Kerberos) event:
- Kin of Kerberos and Arisen Kin of Kerberos
- Followers of Kerberos (not exclusive)
- Manticore and Monoceros (not exclusive)
Dragon Roosts 
Dragon Roosts are available starting Tier 5. They contain only monsters in the Draconian Forces and Dragon families. They reward additional Orns upon completion.
They are mostly farmed for Glatisant, which can show up Tier 9 onwards, for its Questing weapons and a chance at Godforging. Note that Glatisant will not appear in Tiers 5 to 8.
During the Wyrmhunt event, Dragon Roosts are very popular due to every event boss having a chance to Godforge items.
Glatisant, not restricted to a particular event
During the Phoenixrise (formerly known as Rise/Return of the Phoenix) event:
- Fallen Ashen Phoenix
- Ascended Pledge
- Phoenix Pledgelings, Phoenix Halflings, Great Phoenix Pledge and Failed Phoenixes (not exclusive)
During the Wyrmhunt event:
- Lotan, Vritra, Agathodaemon, Zaltys, Beithir, Illuyanka, Bashe, Quetzalcoatl, Gorynych, Ymir (not exclusive)
Chaos Portals 
Chaos Portals are available starting Tier 6. They contain only weather- or time-restricted monsters. They reward additional End-of-Dungeon items upon completion.
They are primarily farmed for ![]() Summoning Scrolls, as
Summoning Scrolls, as ![]() Balor Gateways are Moonlight-restricted monsters.
Other than that, the
Balor Gateways are Moonlight-restricted monsters.
Other than that, the ![]() key cost and difficulty make it an often skipped dungeon.
key cost and difficulty make it an often skipped dungeon.
Stable Keepers, not restricted to a particular event
During The Mischievous Clurichauns event:
- Amadan, Beag, Fergus
During Paths of Fomoria event:
- All event monsters (not exclusive)
Battlegrounds 
Battlegrounds are available starting Tier 8. They contain only monsters in the Lyonesse Forces and Nothren Forces families. They reward additional End-of-Dungeon items upon completion.
They are primarily farmed for Baldr gear and Godforges (Arisen King Meliodas and Baldr). While very hard, Hard-Horde Battlegrounds reward with huge amounts of Orns.
Arisen King Meliodas and Baldr, not restricted to a particular event
Underworld Portals 
Underworld Portals are available starting Tier 9. They contain only monsters in the Balor Forces family. They reward additional End-of-Dungeon items upon completion.
They are the most popular dungeon for their ![]() Balor Gateways and farming
Balor Gateways and farming ![]() Summoning Scrolls.
Summoning Scrolls.
Knight Sirius, not restricted to a particular event
During the Balor Invades event
- Elite Balor Worm
- Elite Balor Guardian / Assassin / Marauder / Warlock (not exclusive)
- Dagda (not exclusive)
- Arisen Dagda
Valleys of the Gods 
Valleys of the Gods are available starting Tier 10. They contain only arisen monsters. They reward additional Gold, Orns and End-of-Dungeon items upon completion.
They have boss floors which, even if the dungeon was run non-horde mode, will contain multiple enemies.
Although expensive (![]() 20), they are the best option for Godforging items.
20), they are the best option for Godforging items.
Exploration Dungeons
Exploration Dungeons' are mainly attractive due to their Deepshards, which can be exchanged for Shrine of Luck and Shrine of Wisdom, and their End of Dungeon Rewards.
Goblin Fortresses
Goblin Fortresses are available starting Tier 3. They contain only monsters in the Orc Horde and Goblin Horde families.
They can be a great source of Orns, with the Elite Kobold Lord, Kobold Lord and the Elite Orc Lord.
Goblin Fortresses are home to these theme-restricted monsters (not restricted to a particular event)
- Hobgoblin Lord
- Elite Kobold Lord, Kobold Lord, Elite Kobold, Elite Kobold Mage
- Elite Orc Lord, Elite Orc, Elite Orc Brute
Mystic Caves 
Mystic Caves are available starting Tier 3. They contain only monsters in the Magical and Ancient families.
They house some enemies which may be difficult to encounter in the world such as the Elemental Cores. Codexers might want to visit them to complete their entries.
Aside from the Deepshards and End-of-Dugeon Rewards, they are not very popular.
- Lost Memories
Theme dungeons infographics
| Dungeon | Tier | Difficulty | Encounters | Reward boost | |
|---|---|---|---|---|---|
| ?? | 1 | Normal | Any monster that is not locked to an event / theme |
None | |
| ?? | 1 | Normal | Orc Horde Goblin Horde |
Gold | |
| ?? | 1 | Normal | Magical Ancient |
Orns | |
| 3 | 1 | Normal | Animal | Orns | |
| 5 | 2 | Normal | Draconian Forces Dragon |
Orns | |
| 6 | 5 | Hard | Any weather- or time-restricted monster |
Items | |
| 8 | 5 | Brutal | Lyonesse Forces Nothren Forces |
Items | |
| 9 | 5 | Hard | Balor Forces | Items | |
| 10 | 20 | Brutal | Arisen monsters | Gold, Orns and Items |
Dungeon options and key cost multipliers
Alongside themes, other difficulty modifiers can be applied to the dungeons for increased rewards, some of which may increase the key cost or dungeon cooldown.
These modifiers are split into 2 categories:
- Modes (Normal, Horde, Endless), one of which exactly must be selected at a time
- Options (Hard, Boss, Include event content) which are all independent
Any combination except for Endless/Boss is valid. Themed dungeon cannot be run as Endless nor Boss. Additionally, Exploration Dungeons cannot be run Horde or Endless.
Normal mode
This is the default setting for a dungeon. On each floor you will face 1 monster only, except for boss floors for some themed dungeons which may have 1 or 2 additional monsters.
Horde mode
Horde mode was introduced in 2022 to help combat the reliance on party play and alts. This allows a single player to encounter multiple enemies per floor, much like you would when doing party dungeons in a group. Horde mode is available in all dungeons, except for your personal gauntlet. Choosing horde mode will not increase the dungeon cooldown timers.
Horde mode does not incur a key cost multiplier, except on regular dungeons where the key cost is multiplied by 3.
Endless mode
In Endless mode, instead of having a set number of floors, dungeons may go infinitely deep and end when the player is defeated.
With each floor enemies' stats increase, but so do their Gold, Orns and Exp rewards.
The rewards multiplier for a floor in endless is floor_number/30.
Since they do not have an "end", endless dungeons do not reward any End-of-Dungeon rewards.
Endless mode is only available on all regular dungeons, including the personal menu gauntlet. It does incur a 5x key cost multiplier and increases the cooldown timer on the dungeon.
Hard Option
The Hard option is available in all dungeon types. It prevents players from using consumables (potions and whatnot) in the dungeon. Hard mode doubles the amount of Gold, Orn and Exp gained from defeating monsters and guarantees the End-of-Dungeon rewards are at least of Superior quality.
The Hard option incurs a x5 key cost multiplier and increases the cooldown timer on the dungeon.
Boss Option
The Boss option is only available in regular dungeons, including the one in your Castle/Fortress and your personal guantlet. With it, every monster spawned in the dungeon will be a boss. The Boss option further halves Gold, Orn and Exp rewards.
The Boss option incurs a x5 key cost multiplier and increases the cooldown timer on the dungeon.
Include event content Option
The default state for this is option is on. This option is available for all dungeons except the menu Gauntlet (where it is always enabled). It allows controlling whether event monsters that would normally appear in the dungeon do appear. For some events, players may prefer to not have event monsters dilute the spawn selection of the dungeon and would uncheck this option.
Activating or not this option does not incur any key cost multiplier.
Key costs multipliers
When selecting multiple options, their key cost multipliers are not added, but multiplied together (e.g.: Hard is x5, Boss is x5, so Hard-Boss is 25x).
An additional multiplier is applied when starting party dungeons. The key cost of opening the dungeon is multiplied by however many members are in the party up to a maximum of 4x (since no more than 4 players can join a dungeon).
The maximum key cost for a dungeon would be ![]() 400 for a Valley of the Gods (20 base
400 for a Valley of the Gods (20 base ![]() cost) with the Hard Option (x5 =
cost) with the Hard Option (x5 = ![]() 100) and in a party of 4 (4x =
100) and in a party of 4 (4x = ![]() 400).
400).
Tier of a dungeon and relation to depth
Battle Dungeons
As your tier increases the number of floors in dungeons increases. The following chart shows, for each tier, what the tier of monsters in each floor is, as well as how many floors a Battle Dungeon has.
| Dungeon Tier | |||||||||||||
| Floor | 1 | 2 | 3 | 4 | 5 | 6 | 7 | 8 | 9 | 10 | 11 | ||
| 1 | 1★ | 1★ | 1★ | 1★ | 2★ | 4★ | 5★ | 7★ | 8★ | 8★ | 8★ | 1 | |
| 2 | 1★ | 1★ | 2★ | 2★ | 3★ | B | 5★ | 7★ | 8★ | 8★ | 8★ | 2 | |
| 3 | 1★ | 1★ | 2★ | 2★ | B | 5★ | B | 7★ | 8★ | 8★ | 8★ | 3 | |
| 4 | 1★ | 1★ | 2★ | 2★ | 4★ | 5★ | 6★ | B | B | 8★ | 8★ | 4 | |
| 5 | B | 2★ | 2★ | 3★ | 4★ | 5★ | 6★ | 8★ | 9★ | B | B | 5 | |
| 6 | 2★ | 2★ | 3★ | 4★ | B | B | 8★ | 9★ | 9★ | 9★ | 6 | ||
| 7 | 2★ | 3★ | 4★ | B | 6★ | 7★ | 8★ | 9★ | 9★ | 9★ | 7 | ||
| 8 | 2★ | 3★ | 4★ | 5★ | 6★ | 7★ | 8★ | 9★ | 9★ | 9★ | 8 | ||
| 9 | B | 3★ | 4★ | 5★ | 6★ | 7★ | 8★ | 9★ | 9★ | 9★ | 9 | ||
| 10 | B | B | 5★ | 6★ | 7★ | B | B | 9★ | 9★ | 10 | |||
| 11 | 5★ | 6★ | 7★ | 7★ | 8★ | B | B | 11 | |||||
| 12 | 5★ | 6★ | 7★ | 7★ | 8★ | 9★ | 9★ | 12 | |||||
| 13 | B | B | B | 7★ | 8★ | 9★ | 9★ | 13 | |||||
| 14 | 7★ | 8★ | 9★ | 9★ | 14 | ||||||||
| 15 | B | Boss Floor | 8★ | 9★ | 9★ | 9★ | 15 | ||||||
| 16 | GF | Chance of boss witha Godforge aura | 8★ | 9★ | B | GF | 16 | ||||||
| 17 | 8★ | 9★ | 10★ | 10★ | 17 | ||||||||
| 18 | 8★ | 9★ | 10★ | 10★ | 18 | ||||||||
| 19 | 8★ | 9★ | 10★ | 10★ | 19 | ||||||||
| 20 | B | B | 10★ | 10★ | 20 | ||||||||
| 21 | 10★ | 10★ | 21 | ||||||||||
| 22 | GF | 10★ | 22 | ||||||||||
| 23 | 10★ | 23 | |||||||||||
| 24 | 10★ | 24 | |||||||||||
| 25 | GF | 25 | |||||||||||
Based on Knight411's chart, based on another chart by Orna Legends
Below is the number of regular monster floors of each tier with relation to the Battle Dungeon tier. Each column corresponds to a dungeon tier. Each row corresponds to a floor tier. This can be used to know which Tier is best to farm when hunting for a specific material. For instance, Ortanite drops from T9 monsters (and T9/T10 bosses), making T10 the best Tier to farm it.
| Floor Tier \ Dungeon Tier | 1 | 2 | 3 | 4 | 5 | 6 | 7 | 8 | 9 | 10 | 11 |
|---|---|---|---|---|---|---|---|---|---|---|---|
| 1 | 4 | 4 | 1 | 1 | |||||||
| 2 | 4 | 5 | 3 | 1 | |||||||
| 3 | 3 | 2 | 1 | ||||||||
| 4 | 3 | 3 | 1 | ||||||||
| 5 | 5 | 3 | 2 | ||||||||
| 6 | 6 | 2 | |||||||||
| 7 | 6 | 7 | |||||||||
| 8 | 10 | 7 | 4 | 4 | |||||||
| 9 | 10 | 9 | 9 | ||||||||
| 10 | 5 | 8 |
Exploration Dungeons
In Exploration Dungeons, there is no monster tier assigned to floors with relation to the depth. Enemies of any tier may appear at any floor during exploration, but they are scaled up to the player's tier.. The following table lists the number of floors in the Dungeon at each tier.
| Tier | Floor Count |
|---|---|
| 1 | N/A |
| 2 | 5 |
| 3 | 5 |
| 4 | 5 |
| 5 | 6 |
| 6 | 7 |
| 7 | 8 |
| 8 | 9 |
| 9 | 10 |
| 10 | 11 |
| 11 | 12 |
End of Dungeon rewards
Successfully defeating the last floor of a dungeon rewards with a currently unknown amount of Exp, Gold and Orns. An additional selection of randomly selected materials is awarded to the player.
Finally, the game rolls in the End-of-Dugeon (EoD) item pool for rewards. This pool includes all quest (including event ones) rewards. It also includes a blank space, meaning that there is a chance to not gain an item for each roll. This blank space is notably used when new items are added to the pool to avoid chipping the drop chance of already existing items.
The process is as follows (repeated for each EoD roll):
- The game randomly rolls from the pool.
- If the blank space is rolled, the process is aborted.
- If the player has completed the quest, the item is awarded.
- If, however, the player has not completed the quest, the item is not awarded and the player does not receive the quest item.
This means that the odds of receiving a specific item do not depend on how many quests were completed. Holding off from completing quests does not improve the odds of a particular item from a completed quest to appear. It's quite the opposite: it sometimes prevents you from receiving a reward at the end of your dungeon!
The quality of the item follows the same rules as other items. The only way of increasing the quality is to run Hard dungeons, Exploration Dungeons or Monuments, all of which guarantee that the items will be of Superior or higher quality. No other factor plays in how the game selects the quality. If the Dungeon was not an Exploration Dungeon or Monument nor run as Hard, the items may be of any quality (including Poor and Broken).
The number of item rolls given depends on the dungeon that was run.
| Dungeon | # of rolls | Superior+ |
|---|---|---|
| Regular Battle Dungeon | 2 | If Hard mode |
| Regular Battle Dungeon + Ornaversary | 4 | If Hard mode |
| Regular Battle Dungeon + Terra Shrine | 4 | If Hard mode |
| Chaos Portal | 4 | If Hard mode |
| Battlegrounds | 4 | If Hard mode |
| Underworld Portal | 4 | If Hard mode |
| Valley of the Gods | 4 | If Hard mode |
| Exploration Dungeon | 5 | Yes |
| Monument | 2 | Yes |
The increased number of items awarded by Exploration Dungeons as well as their increased quality make Exploration Dungeons a very lucrative farm for End-of-Dungeon items.
They have low ![]() key cost (especially compared to Hard Dungeons) meaning the EoD item per key ratio is very high.
Bands of Gods of high quality can be most easily farmed in Exploration Dungeons.
key cost (especially compared to Hard Dungeons) meaning the EoD item per key ratio is very high.
Bands of Gods of high quality can be most easily farmed in Exploration Dungeons.
Any dungeon can reward with any item whose quest has been completed, no matter the tier. There are reports of players receiving a T9 Band of Gods from low-tier Dungeons.
Raids are powerful enemies that can be summoned through special means or very rarely found naturally in the overworld. There exists 3 main different kinds of raids:
- World Raids, fought on the overworld, summoned by players or naturally spawned
- Kingdom Raids, started by expending Kingdom Orns
- Super Raids, event raids (summoned by players) who are more powerful than other raids
Raid mechanics
Fights
Drops
Drop % Material drop rolls and item drop rolls Can't drop items above your tier (OHB, kingdom raids) No Sphinx Tail
WRBs give high amounts of XP up until T9. The XP requirements at T10 are such that WRBs no longer are the best XP source. The XP/Orn ratio for WRBs is very high! This means that, if you feel you like you need more Orns than XP, WRBs are not the right focus for you now. With the 3.0 update, WRBs now also drop a decent amount of random materials, including rarer end-game materials (e.g.: Cursed Ortanite), mid-game boss materials (e.g.: Broken Stone) or herbs.
Kinds of Raids
World Raids
Spawning
World Raids (called WRB, for "World Raid Boss") are encountered on the overworld.
They scarcely spawn on the overworld and are so rare that their exact spawning mechanics are impossible to research.
They are usually summoned by players through the use of different scrolls, the most common one being the ![]() Summoning Scroll.
Summoning Scroll.
Using a WRB-summoning item will spawn one WRB in the vicinity of the player's location. Since Wayvessels change a player's location, if the player has travelled through a Wayvessel, the WRB is summoned at the Wayvessel location, rather than the player's GPS location. A WRB is randomly selected from the "Raid Pool" associated with the item and summoned. The Raid Pool is different for each summoning item and may vary further depending on active events. It also changes depending on the player's tier: a player can only summon a WRB of its tier, 1 tier below or 2 tiers below (for that matter, T11 counts as T10, so both T11 and T10 can summon T8, T9 or T10 WRBs).
A WRB can either be "public" or "private".
When publicly summoned, the WRB is visible and can be attacked by any nearby-passing player (or through a Wayvessel).
When privately summoned, the WRB is only visible and can only be attacked by any nearby-passing party member of the player who summoned the WRB.
![]() Summoning Scrolls offer the player to choose between the two, while other items will always summon a private WRB.
Once summoned, a WRB stays on the overworld until defeated; they cannot naturally despawn.
Summoning Scrolls offer the player to choose between the two, while other items will always summon a private WRB.
Once summoned, a WRB stays on the overworld until defeated; they cannot naturally despawn.
WRB summoning items
 Summoning Scroll
 Monumental's Summoning Scroll
 Festive Summoning Scroll
 Crimson Summoning Scroll (Aries, Cerus, Perseus)
 Celestial Moondrop
Raid Pool
Summoning Scrolls Raid Pool
The most complex Raid Pool is that of the ![]() Summoning Scroll.
It is divided into two parts: permanent raids, available throughout the year, and event raids, available only during the event of said raid.
Summoning Scroll.
It is divided into two parts: permanent raids, available throughout the year, and event raids, available only during the event of said raid.
Permanent raids are:
- T6:
 Fey Gazer
 - T7:
 Fey Dragon,
  First Horseman,
  Yggdrasil
 - T8:
 Fey Cockatrice,
  Second Horseman
 - T9:
 Fey Yeti,
  Third Horseman
 - T10:
 Fey Chimera,
  Final Horseman,
  Arisen Morrigan,
  Arisen Yggdrasil,
  Ashen Phoenix
Depending on the event, numerous other raids can be summoned.
The full list of which raids can be summoned is found in List of Raids.
Event raids in the list with a ![]() icon can be summoned using Summoning Scrolls only while their event is active.
The Summoning Scroll only summons World Raids and cannot summon a Super Raid.
icon can be summoned using Summoning Scrolls only while their event is active.
The Summoning Scroll only summons World Raids and cannot summon a Super Raid.
Monumental's Summoning Scroll Raid Pool
The ![]() Monumental's Summoning Scroll summons raids from the event raids of the
Monumental's Summoning Scroll summons raids from the event raids of the ![]() Summoning Scroll.
Using it is exactly as using a regular Summoning Scroll but filtering out permanent raids.
It follows that while it summons event raids, it cannot summon raids that a Summoning Scroll cannot summon (Super Raids, raids which have their own summoning item).
Summoning Scroll.
Using it is exactly as using a regular Summoning Scroll but filtering out permanent raids.
It follows that while it summons event raids, it cannot summon raids that a Summoning Scroll cannot summon (Super Raids, raids which have their own summoning item).
Festive Summoning Scroll Raid Pool
![]() Festive Summoning Scrolls can only be used during the Winter Wild Hunts event.
They only summon event raids from active events, but aren't bound to the limitations of the
Festive Summoning Scrolls can only be used during the Winter Wild Hunts event.
They only summon event raids from active events, but aren't bound to the limitations of the ![]() Monumental's Summoning Scroll.
They are able to summon Super Raids as well as Kingdom Raids.
Furthermore, they ignore the at most 2 tiers below restriction of scrolls; they may summon raids more than 2 tiers below your own tier.
Monumental's Summoning Scroll.
They are able to summon Super Raids as well as Kingdom Raids.
Furthermore, they ignore the at most 2 tiers below restriction of scrolls; they may summon raids more than 2 tiers below your own tier.
They can be crafted during the Winter Wild Hunts event at the Monumental Guild in the Archcrafting section from 6 Stranger's Gift and 25 ![]() Proofs of Monument.
Proofs of Monument.
Crimson Summoning Scrolls and Celestial Moondrops
![]() Crimson Summoning Scrolls and
Crimson Summoning Scrolls and ![]() Celestial Moondrops are event items which summon from a very limited Raid Pool.
From an implementation point of view, they behave like Super Raids.
From a gameplay point of view, they do not feel like Super Raids: they are as strong as regular WRBs and their drops are on-par with other WRBs.
The List of Raids lists which raids are summoned by these items.
Celestial Moondrops are event items which summon from a very limited Raid Pool.
From an implementation point of view, they behave like Super Raids.
From a gameplay point of view, they do not feel like Super Raids: they are as strong as regular WRBs and their drops are on-par with other WRBs.
The List of Raids lists which raids are summoned by these items.
![]() Crimson Summoning Scrolls can be crafted during the Crimson Festival event at the Monumental Guild in the Archcrafting section from 10 Essence (Aries, Cerus, Perseus) and a
Crimson Summoning Scrolls can be crafted during the Crimson Festival event at the Monumental Guild in the Archcrafting section from 10 Essence (Aries, Cerus, Perseus) and a ![]() Summoning Scroll.
Summoning Scroll.
![]() Celestial Moondrops are dropped from Fallen Moonchasers and Fallen Crescent-Fencers during the Of Giants and Titans event.
Celestial Moondrops are dropped from Fallen Moonchasers and Fallen Crescent-Fencers during the Of Giants and Titans event.
Farming Summoning Scrolls
Sources
![]() Summoning Scrolls are mostly obtained from defeating
Summoning Scrolls are mostly obtained from defeating ![]() Balor Gateways (T7 or T9). You can also acquire them:
Balor Gateways (T7 or T9). You can also acquire them:
- As a drop from the Fey Yeti or
 The Fool (T9) WRB
 - As a reward for clearing a floor in a Tower of Olympia
- As a reward for clearing a floor in a Monument
- As a reward for clearing a dungeon
- From your Citadel (up to 3 Summoning Scrolls at once)
- From the Runeshop Daily Gift
- As a reward in the Archpath
- From a Guild Shop (except Circle of Anguish)
- Blade of Finesse: 50
 Proofs of Sparring
 - Conqueror: 15
 Proofs of Crownship
 - Fishing: 500
 Corals
 - Monumental: 30
 Proofs of Monument
 - Oracle Temple: 50
 Proofs of Remembrance
 - Spelunking: 250
 Refined Deepshards
 - Titanfelled: 5000
 Tower Shards
 - Traveler: 8
 Proofs of Distance
- Blade of Finesse: 50
Farming
If targetting only ![]() Summoning Scrolls, the fastest way would be running
Summoning Scrolls, the fastest way would be running ![]() Underworld Portals or
Underworld Portals or ![]() Chaos Portals.
Otherwise, running regular dungeons, the preferred tiers are T9, then T10, then T8 and finally T7.
Chaos Portals.
Otherwise, running regular dungeons, the preferred tiers are T9, then T10, then T8 and finally T7.
The introduction of guilds has given rise to more ways of farming Summoning Scrolls passively while taking on other activities. The most notable ones are the Titanfelled and Monumental guilds. Both these guilds allow for farming their currency to buy Summoning Scrolls while granting a chance at earning them while farming the currency.
Notes:
- Balor Gateways can very rarely be found on the overworld, but only in Moonlight weather (or by using Chaos Scrolls). We ignored that in this section, as this is by no means a reliable way of farming Summoning Scrolls.
- Summoning Scrolls are not a guaranteed drop from Balor Gateways, even when reaching the Luck cap.
- Party Dungeons are preferred to solo dungeons. With a full party of 4, each member can enter the dungeon as a host for the others, meaning a single dungeon location can lead up to 4 runs.
Kingdom Raids
Cost, availability to members Event raids != from WRB sometimes Different enrage% Link to Kingdom Page List of Kd raids link below
Super Raids
Super Raids are stronger World Raids that mean to be a "final boss" for the event.
Differences from WRB
- Super Raids cannot be summoned by a Summoning Scroll or a Monumental's Summoning Scroll.
- Items dropped from Super Raids do not appear in the Monumental Guild Shop to be rolled expending Proofs of Avarice.
Super Raid summoning items
 Scroll of Anguish
- Bought from the Circle of Anguish Guild Shop for 90
 Proofs of Melancholy
- Bought from the Circle of Anguish Guild Shop for 90
 Beastfelled Summoning Scroll
- During the Beastfelled event in the Monumental Guild in the Archcrafting section
- 7 Kerberos Furs, 7 Manticore Hearts and 7 Monoceros Horns
- During the Beastfelled event in the Monumental Guild in the Archcrafting section
 Scroll of Dynasty
- During the Thronemakers event in the Monumental Guild in the Archcrafting section
 Windtamer's Summoning Scroll
- During the Fallen Heroes of Avalon event in the Monumental Guild in the Archcrafting section
- 10 Hippogriff Talons, 10 Hippogriff Tails and 10 Hippogriff Quills
- During the Fallen Heroes of Avalon event in the Monumental Guild in the Archcrafting section
 (Fey) Scroll of Ragnarok
- During the Nothren Legends: Ragnarok event in the Monumental Guild in the Archcrafting section
 Tablet of Hyperion
- During the Of Giants and Titans event in the Monumental Guild in the Archcrafting section
 Arisen Scroll of Rift Distortion
- During the Rift Distortion event in the Monumental Guild in the Archcrafting section
 (Arisen) Hallowed Summoning Scroll
- During the The Hallowed event in the Monumental Guild in the Archcrafting section
- Hallowed Summoning Scroll: 2 Dried Oaks, 2 Rotten Leaves, 2 Refined Sugars, 2 Tattered Clothwraps, 2 Chiroptera Remains and 2 Fragments of the Planet's Core
- Arisen Hallowed Summoning Scroll: 3 Dried Oaks, 3 Rotten Leaves, 3 Refined Sugars, 3 Tattered Clothwraps, 3 Chiroptera Remains and 3 Fragments of the Planet's Core
- During the The Hallowed event in the Monumental Guild in the Archcrafting section
Sharing raids
Raids as a trading currency
Mirroring
Sanding
Sanding a Raid means hitting it for as little damage as possible with the only goal being to enter the Raid drop pool. Any player who deals 2 or more damage to a Raid is eligible for Raid rewards. Since items from raid have a minimum (TBD) chance of dropping, even hitting Arisen Morrigan (34MHP) for 2 damage may reward the player with multiple items. Sanding effectively increases the overall rewards sent out from a defeated Raid.
Let's assume the minimum drop chance for an item is 1%. The maximum drop chance for a legendary-rarity item is 45%. Ashen Phoenix has 11,300,000 HP.
In a perfect (and also unreasonable) scenario, 5,650,000 people could hit it for 2 damage. This means the assumed 1% drop chance for a legendary-rarity item would be rolled 5,650,000 times, yielding an average of 56,500 items to the community (not to individual players).
In a more realistic scenario, let's assume 10 players hit the raid for 1000 damage each and the 11th player finishes the raid (for 11,290,000 damage out of the 11,300,000 HP). The 10 sanding players each have the assumed 1% drop chance for the legendary-rarity item. The 11th player would have dealt ~99.91% damage to the raid and would have an ~44.96% chance of receiving the legendary-rarity item. The 0.04% drop chance the 11th player gave up in letting the 10 players sand offers them an assumed 1% drop chance each.
Sanding takes its name from the Sands of Aaru spell. This spell has a high stat multiplier (meaning it can easily pierce the Raid's defences) but a very low damage multiplier (meaning that once defences are pierced, the damage won't be high). It also has the advantage of working with both Magic and Attack based builds, taking whichever stat is the highest. It is the recommended spell to use for sanding.
Various tips for sanding
- Do not bring any pet / summon with a damaging attack move
- Lower-tier classes have less base offensive stats, making them easier to bring low enough to not deal more than 1000 damage
- Arisen Monster Tomes (-125) and Mighty Mimic Heads (-50) of high quality heavily bring your offensive stats down if needed (attack and magic in equal amounts)
- Another more expensive option is using Titan augments (Lungs of Eos (-135), Legs of Eos (-60), Lungs of Selene (-45)). They will need to be of high quality to negate the celestial weapon's stat.
- Other adornments of note are Ashen Pinion (-40) and Stardust (-30)
- Sands of Aaru never misses, ensuring your damage on turn 1 before you get attacked and making defensive stats meaningless (do still keep enough Mana)
- If your class of choice does not have Mystic Feather or Second Chance, you may often be quickly forced out of a fight, saving you a bit of time if you need to sand a lot of raids
- Sanding not only applies to WRB but also to Kingdom Raids
- Beware of passives whose stat increase may vary
- Passives such as Power of the Gods (e.g.: Gaia) which increase stats and are visible in the Status menu
- Passives such as Iconoclast (e.g.: Heretic) which increase stats depending on the battle state and are invisible in the Status menu
- Global passives such as Origin Town which add 10% to your stats (visible in the Status menu)
Perfect sanding stats
The following table is an attempt to find the perfect offensive stat value for every raid to deal 2 damage using Sands of Aaru. The damage dealt depends on the defensive stats of the Raid. Thankfully, their Defence and Resistance stats are equal, so there is no difference in the Attack or Magic needed. Figuring out the defensive stats of Raids is a work in progress. Only Raids whose stats are known are listed below.
| Name | Tier | ||
|---|---|---|---|
| Arisen Balin | 10 | 2474 | 507 |
| Arisen Ebon Scruug | 10 | 2574 | 527 |
| Arisen Fenja | 10 | 1958 | 404 |
| Arisen Gerd | 10 | 1958 | 404 |
| Arisen Judge Charon | 10 | 2750 | 562 |
| Arisen Judge Rhada | 10 | 2750 | 562 |
| Arisen Kerberos | 10 | 1782 | 368 |
| Arisen Morrigan | 10 | 5114 | 1035 |
| Arisen Rift Judgement | 10 | 2750 | 562 |
| Arisen Yggdrasil | 10 | 2574 | 527 |
| Ashen Phoenix | 10 | 2034 | 419 |
| Fey Chimera | 10 | 2034 | 419 |
| Final Horseman | 10 | 2034 | 419 |
| Finesse | 10 | 2574 | 527 |
| Great Anguish | 10 | 5544 | 1121 |
| The Last Hippogriff | 10 | 2034 | 419 |
| Turned King Lyncus | 10 | 2342 | 480 |
| Arisen Cade | 9 | 2070 | 426 |
| Fey Yeti | 9 | 1670 | 346 |
| Noble Perseus | 9 | 1890 | 390 |
| The Fool (T9) | 9 | 2070 | 426 |
| The Mightiest Mimic | 9 | 2040 | 420 |
| Third Horseman | 9 | 1670 | 346 |
| Almighty Balin | 8 | 1200 | 252 |
| Fallen Judge Charon | 8 | 1680 | 348 |
| Fallen Judge Charon | 8 | 1680 | 348 |
| Fenja | 8 | 1144 | 241 |
| Fey Cockatrice | 8 | 1200 | 252 |
| Kerberos | 8 | 1200 | 252 |
| Mimic King of Kings | 8 | 1792 | 370 |
| Second Horseman | 8 | 1200 | 252 |
| Sister Macha | 8 | 1512 | 314 |
| Fey Dragon | 7 | 924 | 197 |
| Grand Knight Lugus | 7 | 1000 | 212 |
| Ingenious Cade | 5 | 338 | 80 |
The offensive stat is the minimum you need to hit for at least 2 damage. Due to the wide range of Sands of Aaru's damage multiplier, damage can range from 2 to 4.
Offensive stats 1 or 2 points below that indicated may hit for only 1 damage. Offensive stats 1 or 2 points above that indicated reduces the odds of hitting for 2 damage and may also hit for 5 damage. Above that, scaling goes according to Sands of Aaru's damage multiplier.
You can expect your damage to be between 2 + stat_above * 0.07 and 4 + stat_above * 0.15, with stat_above the difference between your offensive stat and that listed in the table.
You should not be 2656 stat points above, as this makes it possible to hit for more than 1000 damage.
The above table was generated by reversing the damage formula. Instead of the damage being a variable, we use the offensive stat.
Where the damage formula is (PvE, using mag as an example):
\[ \text{damage} = \lfloor(\text{mag}*\text{stat-multiplier} - \frac{\text{res}}{2}) * \text{damage-multiplier} \rfloor \]
We can reorder terms to have:
\[ \text{mag} = \lceil (\frac{\text{damage}}{\text{damage-multiplier}} + \frac{\text{res}}{2}) / \text{stat-multiplier} \rceil \]
We replace stat-multiplier with Sands of Aaru's one (2.5) and damage-multiplier with its lowest bound (0.07).
We can also replace damage with 2, which is our target damage.
List of Raids
So as to not span the columns too wide, the following abbreviations are used in the heading:
T= TierSS= Summoning ScrollK= KingdomAW= Arisen Waygate
| Name | T | SS | K | AW | Other |
|---|---|---|---|---|---|
| Age-Old Mimic | 5 | ||||
| Almighty Balin | 8 | ||||
| Aloof Aries | 9 | Crimson Summoning Scroll (Aries) | |||
| Apollyon | 9 | ||||
| Aries | 6 | Crimson Summoning Scroll (Aries) | |||
| Arisen Asteria of Olympia | 10 | Celestial Moondrop | |||
| Arisen Atlas of Olympia | 10 | Celestial Moondrop | |||
| Arisen Balin | 10 | ||||
| Arisen Cade | 9 | ||||
| Arisen Covyn | 10 | ||||
| Arisen Ebon Scruug | 10 | ||||
| Arisen Fenja | 10 | ||||
| Arisen Gerd | 10 | ||||
| Arisen Hel | 10 | ||||
| Arisen Judge Achlys | 10 | ||||
| Arisen Judge Charon | 10 | ||||
| Arisen Judge Rhada | 10 | ||||
| Arisen Kerberos | 10 | ||||
| Arisen Menja | 10 | ||||
| Arisen Merlin | 9 | ||||
| Arisen Morrigan | 10 | ||||
| Arisen Naggeneen | 9 | ||||
| Arisen Ophion of Olympia | 10 | Celestial Moondrop | |||
| Arisen Phoenix | 9 | ||||
| Arisen Pumpkinhead | 10 | ||||
| Arisen Pumpkinless | 10 | Arisen Hallowed Summoning Scroll | |||
| Arisen Quetzalcoatl | 10 | ||||
| Arisen Rift Judgement | 10 | Scroll of Arisen Rift Distortion | |||
| Arisen Surtr | 10 | ||||
| Arisen Thronemaker Neith | 10 | ||||
| Arisen Thronemaker Ptah | 10 | ||||
| Arisen Thronemaker Sekhmet | 10 | ||||
| Arisen Warlock Trevelyan | 9 | ||||
| Arisen Yggdrasil | 10 | ||||
| Ashen Phoenix | 10 | ||||
| Asteria of Olympia | 8 | Celestial Moondrop | |||
| Atlas of Olympia | 8 | Celestial Moondrop | |||
| Beguiled Apollyon | 10 | ||||
| Beguiled Apollyon X | 10 | Use a Balor Mnemonic to be teleported Arisen-Waygate-style to a place where Beguiled Apollyon X is. | |||
| Beguiled Apollyon Y | 10 | Use a Balor Mnemonic to be teleported Arisen-Waygate-style to a place where Beguiled Apollyon Y is. | |||
| Cerus | 6 | Crimson Summoning Scroll (Cerus) | |||
| Covyn | 5 | ||||
| Dangy | 7 | ||||
| Dracon | 3 | ||||
| Ebon Scruug | 9 | ||||
| Fallen Judge Achlys | 6 | ||||
| Fallen Judge Charon | 8 | ||||
| Fallen Judge Rhada | 7 | ||||
| Fallen King Arthus | 8 | ||||
| Fallen Merlin | 6 | ||||
| Fallen Warlock Trevelyan | 6 | ||||
| Fenja | 8 | ||||
| Ferocious Cerus | 9 | Crimson Summoning Scroll (Cerus) | |||
| Fey Chimera | 10 | ||||
| Fey Cockatrice | 8 | ||||
| Fey Dragon | 7 | ||||
| Fey Gazer | 6 | ||||
| Fey Jormungandr | 10 | Fey Scroll of Ragnarok | |||
| Fey Yeti | 9 | ||||
| Final Horseman | 10 | ||||
| Finesse | 10 | ||||
| First Horseman | 7 | ||||
| Flax44 | 9 | ||||
| Fomor | 4 | ||||
| Furious Cerus | 9 | ||||
| Gerd | 8 | ||||
| Grand Knight Lugus | 7 | ||||
| Great Anguish | 10 | Scroll of Anguish | |||
| Great Murk | 8 | Available during Terra's Legacy at Gloomsites | |||
| Great Murk | 9 | Available during Terra's Legacy at Gloomsites | |||
| Great Murk | 10 | Available during Terra's Legacy at Gloomsites | |||
| Great Sphinx | 10 | Scroll of Dynasty | |||
| Havel | 6 | ||||
| Hel | 5 | ||||
| Hyperion | 10 | Tablet of Hyperion | |||
| Ingenious Cade | 5 | ||||
| Jormungandr | 8 | Scroll of Ragnarok | |||
| Kerberos | 8 | ||||
| King of Ljosalfar | 5 | ||||
| Last Titan | 6 | ||||
| Maelor | 7 | ||||
| Menja | 7 | ||||
| Mimic King of Kings | 8 | ||||
| MmmPizza | 6 | ||||
| Mochi | 5 | ||||
| Naggeneen | 7 | ||||
| Noble Perseus | 9 | Crimson Summoning Scroll (Perseus) | |||
| ob | 5 | ||||
| Ophion of Olympia | 8 | Celestial Moondrop | |||
| Orochi | 8 | ||||
| Perseus | 6 | Crimson Summoning Scroll (Perseus) | |||
| Phoenix | 7 | ||||
| Pumpkin Spider | 4 | ||||
| Pumpkinhead | 8 | ||||
| Pumpkinless | 8 | Hallowed Summoning Scroll | |||
| Purrly | 8 | ||||
| Rift Judgement | 8 | Scroll of Rift Distortion | |||
| Scruug | 5 | ||||
| Second Horseman | 8 | ||||
| Sister Badb | 7 | ||||
| Sister Macha | 8 | ||||
| Sister Neman | 6 | ||||
| Starlord | 5 | ||||
| Surtr | 5 | ||||
| Tatzelwurms | 5 | ||||
| The Creator | 10 | ||||
| The Dioscuri | 9 | This is an "old" kingdom raid who no longer is available. | |||
| The Fool | 6 | ||||
| The Fool | 9 | ||||
| The Last Hippogriff | 10 | Windtamer's Summoning Scroll | |||
| The Mightiest Mimic | 9 | ||||
| The Morrigan | 10 | ||||
| Third Horseman | 9 | ||||
| Thronemaker Neith | 6 | ||||
| Thronemaker Ptah | 8 | ||||
| Thronemaker Sekhmet | 7 | ||||
| Tricky Aries | 9 | ||||
| Turned King Lyncus | 10 | Beastfelled Summoning Scroll | |||
| Untarnished Perseus | 9 | ||||
| Yggdrasil | 7 | ||||
| Young Apollyon | 5 | ||||
| Zeus | 9 |
Overview
How to find
Advantages
Resources
Gauntlets
Kingdom Gauntlets are one of the few ways of obtaining Kingdom Orns and the most lucrative if carried out seriously. A Gauntlet has a certain number of floors, where a member is randomly selected to fight a monster or a boss. Once sufficient fights are won, the Gauntlet is won and the Kingdom receives Kingdom Orns.
Basic overview
Kingdom Gauntlets may be started by Officers in exchange for Kingdom Gold. The game randomly selects, for each floor, one unbenched Kingdom Member to fight a random enemy. Members selected to fight in the Gauntlet receive a Push Notification and can take their fight regardless of whether fights from the previous floors have been taken. Once sufficient fights have been won, the Kingdom is victorious in its Gauntlet and receives Kingdom Orns. Officers can then start another Kingdom Gauntlet.
Starting a Gauntlet
Officers can start a Gauntlet only if there is no Gauntlet already started and if there are at least 6 unbenched Members.
At least 1 hour must have elapsed between 2 starts of a Gauntlet (this timer starts when starting a Gauntlet; there needs not be 1 hour between the end of a Gauntlet and the start of the next one).
The cost of a Kingdom Gauntlet is 2400 * roster_size Kingdom Gold.
Benched Members contribute to the roster size (benching Members does not reduce the cost of a Gauntlet).
The number of floors in a Gauntlet depends on the number of unbenched members in the Kingdom at the time the Gauntlet is started. The rules are as follows:
- If there are 6 to 14 unbenched Members, the Gauntlet has 10 floors.
- If there are 15 to 19 unbenched Members, the Gauntlet has 12 floors.
- From 20 unbenched Members onwards, the number of floors increases by 4 for every 5 members.
This gives the following table (ranges inclusive):
| Unbenched Members | Number of Floors |
|---|---|
| 6-14 | 10 |
| 15-19 | 12 |
| 20-24 | 16 |
| 25-29 | 20 |
| 30-34 | 24 |
| 35-39 | 28 |
| 40-44 | 32 |
| 45-49 | 36 |
| 50 | 40 |
For each floor, a random unbenched Member is selected. If a Member is selected for a floor, they are not excluded from the selection pool for later floors. This means that a Member may be assigned multiple floors.
Enemies are chosen randomly, from the list of monsters and bosses of the tier of the Member (a T5 Member will face a T5 enemy). That list includes enemies from active events, but not from inactive events. They have a rare chance of being Berserk.
All characteristics of a Gauntlet are set when it is started. Benching or unbenching Members while the Gauntlet is being fought does not change the number of floors or the number of allowed losses.
Fighting a Gauntlet
Gauntlets can be fought through the Gauntlet tab in the Kingdom menu. Fights use the player's Dungeon loadout. A fight is considered lost if the player is defeated. However, before being defeated, they can flee from the fight freely and as many times as they want. When the fight is restarted, the enemy will be back to full health. Even though fights take place in a dungeon, they award full Gold/Orn/Exp.
Should a fight prove too hard for a Member or if a Member is inactive, Officers can "shuffle" a Gauntlet floor. Shuffling replaces the fight by a new one, following the same rules described in Starting a Gauntlet. The replaced floor is removed, all further floors are moved up by one and the new fight is appended at the bottom of the Gauntlet. Shuffling is instantaneous and on a 20mn timer, shared by all Officers. Shuffling can be done on any unfought floor, except those that were started (i.e.: a Member is currently fighting it, or has attempted it and fled).
Shuffling often and cleverly is the key to completing Gauntlets fast. A lot of organization and knowledge of Members' habits are required in order to efficiently shuffle. Ideally:
- Try to shuffle as often as possible.
- Shuffle Members who may lose their fight or may not take it promptly (e.g.: it's nighttime in their timezone, they went hiking with poor reception, ...).
- Avoid shuffling Members who have multiple floors to fight.
End of a Gauntlet
A Gauntlet ends when it is either won or lost.
Kingdoms are allowed a few lost fights in the Gauntlet. If, when the Gauntlet was started, there were less than 15 unbenched Members, the Kingdom is allowed 2 lost fights. Otherwise, if there were 15 or more unbenched Members, the Kingdom is allowed 3 lost fights. Upon losing the 2nd or 3rd fight respectively, the Gauntlet is lost and the Kingdom gains no Kingdom Orns. A new Gauntlet can be started by Officers, if the 1h cooldown has elapsed.
In order for the Gauntlet to be won, there has to be at least nb_floors - (losses_allowed + 1) + losses floors won.
This means that not everybody has to take their fight before a new Gauntlet can be started.
Most typically, for 3 losses allowed and no lost fight, all floors but 4 have to be won.
In this example, the 5th-to-last won fight will complete the Gauntlet, provide the Kingdom with Orns, and allow the Officers to start the next Gauntlet (if the 1h cooldown has elapsed).
Rewards
The number of Orns gained depends on the number of floors and their tiers. All floors in the Gauntlet at the time the Gauntlet is won, whether fought or not, will reward with Kingdom Orns.
The amount of Kingdom Orns earned for each floor depending on the tier is summarized below:
| Tier | Kingdom Orns |
|---|---|
| 2 | 62 |
| 3 | 125 |
| 4 | 200 |
| 5 | 300 |
| 6 | 425 |
| 7 | 550 |
| 8 | 900 |
| 9 | 1000 |
| 10 | 1250 |
| 11 | 1250 |
The amount of Kingdom Orns earned for a Gauntlet is the sum of the Kingdom Orns earned for each floor (whether won, lost or unfought) of the Gauntlet at the moment of completion.
Wars
Anguish 2.0
Unlocks at 1:
- Traveler's Guild
Unlocks at 5:
- Monumental
Unlocks at 40:
- Fishing Hut
Unlocks at 75:
- Blades of Finesse
Unlocks at 175:
- Circle of Anguish
Anguish 2.0 is the second iteration of Orna's Anguish Guild. It spent multiple months in development and testing, with continuous feedback from the community, and started rolling out on May 27th 2025. It addresses balance conerns and pain points of the original Anguish system.
The Circle of Anguish is a Passive Guild that aims at giving players an end-game challenge and combatting the power creep the Ascension mechanism introduced. Pledging allegiance to the Circle of Anguish allows players to buff enemies and inflict themselves with negative battle modifiers in order to diversify and increase their battle rewards.
The Circle of Anguish has 4 different "Paths", each with its dedicated Proof currency and affecting a distinct subset of activities in Orna:
- The Path of Despair: Affects encounters found in the overworld (both Monsters and Bosses) and Fishing encounters.
- The Path of Melancholy: Affects encounters found in both Battle and Exploration Dungeons.
- The Path of Agony: Affects World Raids and Super Raids.
- The Path of Torment: Affects Towers of Olympia (including their Titan Boss at the top) and Monuments.
Each of these Paths is controlled independently: their levels, rewards, modifiers, ... can be adjusted for one content without affecting the other content. This also means that increasing a Path's maximum level has no influence on other Path's levels
Anguish Mechanism
Path Level of Anguish
Each Path has a Level of Anguish assigned to it. The higher the Level of Anguish, the harder the battles and the better the rewards.
Levels, aside from the first, have to be unlocked one by one (see Requirements below). Once unlocked, players may freely and at no cost adjust the Level of Anguish from 0 to the max Level they have unlocked.
Requirements
Levelling a Path up requires the player to sacrifice Proofs of the current Path, as well as having obtained Anguished Gear of at least the current Anguish Path Level.
The Anguished Gear is not sacrificed upon levelling a Path up.
Also, it is not required that it comes from the Path to be levelled up: an Anguished 2 Ljosalfar Sword obtained in a Dungeon (Path of Melancholy) can be used to level the Path of Despair up from level 2 to 3 (provided the player has sufficient ![]() Proofs of Despair).
Note: The Anguished Gear has to be in your inventory (not your Keep).
Proofs of Despair).
Note: The Anguished Gear has to be in your inventory (not your Keep).
The following table summarizes the amount of Proofs that have to be sacrified to level a Path up:
| Path Level | Proofs | Path Level | Proofs |
|---|---|---|---|
| 1 | 0 | 26 | |
| 2 | 110 | 27 | |
| 3 | 223 | 28 | |
| 4 | 337 | 29 | |
| 5 | 451 | 30 |
Choices
Mechanics
Each Level of Anguish lets the player select between 4 Choices to alter their Paths. These Choices are per-Path and only influence the content to which the selected Path applies. Below are the Choices for the Path of Melancholy (Dungeons) at Level 1 (Choice 4 is selected):

The Modifiers associated with selected Choices along a Path add up (they do not stack multiplicatively). For instance, when the Anguish Level is set to 3, the Choices selected at Levels 1, 2 and 3 all add up to battles affected by the Path.
While Choices can be modified, they require the use of an Anguished Pathspur. These can be bought from the Guild Shop and are consumed upon use. They reset all Choices made in the selected Path and let players make new Choices again.
While the selection amongst the 4 Choices for each Path Level is free for all players, the 4 Choices for a given Path and Level are the same across all players. Should they want to, a player can copy another player's Choices and walk the exact same Path.
List of choices
The following tables are large and collapsed by default.
 Despair
| Lv | Choice 1 | Choice 2 | Choice 3 | Choice 4 |
|---|---|---|---|---|
| 1 | Enemy stats: +22% EXP Bonus: 2% Orn Bonus: 4.5% Gold Bonus: 3% Item Drop Quality Bonus: 0.01% Proof of Despair Chance: 12% Ang. Gear Chance: 5% Damage from Undead: +4% Damage from Magic Foes: +2% Damage from Nothren: +3% | Enemy stats: +22% EXP Bonus: 4.5% Orn Bonus: 3% Gold Bonus: 4% Proof of Despair Chance: 10% Ang. Gear Chance: 10% Status Protection: -1% | Enemy stats: +22% EXP Bonus: 2% Orn Bonus: 4.5% Gold Bonus: 3% Item Drop Quality Bonus: 0.01% Proof of Despair Chance: 12% Ang. Gear Chance: 5% Crit Chance: -7% Crit Damage: -9% | Enemy stats: +22% EXP Bonus: 4.5% Orn Bonus: 3% Gold Bonus: 4% Proof of Despair Chance: 10% Ang. Gear Chance: 10% Fire Damage: -3% Water Damage: -5% Lightning Damage: -4% Earthen Damage: -5% |
| 2 | Enemy stats: +22% EXP Bonus: 2.13% Orn Bonus: 4.8% Gold Bonus: 3.2% Proof of Despair Chance: 1% Ang. Gear Chance: 0.5% Holy Damage: -4% Dark Damage: -4% Dragon Damage: -2% Arcane Damage: -5% | Enemy stats: +22% EXP Bonus: 4.8% Orn Bonus: 3.2% Gold Bonus: 4.27% Proof of Despair Chance: 0.5% Ang. Gear Chance: 1% Multi-target Damage: -5% | Enemy stats: +22% EXP Bonus: 2.13% Orn Bonus: 4.8% Gold Bonus: 3.2% Proof of Despair Chance: 1% Ang. Gear Chance: 0.5% Accuracy: -1% | Enemy stats: +22% EXP Bonus: 4.8% Orn Bonus: 3.2% Gold Bonus: 4.27% Proof of Despair Chance: 0.5% Ang. Gear Chance: 1% Healing: -9% |
 Melancholy
| Lv | Choice 1 | Choice 2 | Choice 3 | Choice 4 |
|---|---|---|---|---|
| 1 | Enemy stats: +20% EXP Bonus: 3% Orn Bonus: 5% Luck Bonus: 3% Item Drop Quality Bonus: 0.01% Proof of Melancholy Chance: 12% Ang. Gear Chance: 5% Damage from Balor: +4% Damage from Animals: +2% Damage from Lyonesse: +3% | Enemy stats: +20% EXP Bonus: 5% Orn Bonus: 3% Luck Bonus: 3% Proof of Melancholy Chance: 10% Ang. Gear Chance: 10% Accuracy: -1% | Enemy stats: +20% EXP Bonus: 3% Orn Bonus: 5% Luck Bonus: 3% Item Drop Quality Bonus: 0.01% Proof of Melancholy Chance: 12% Ang. Gear Chance: 5% Damage from Dragons: +3% Damage from Ancients: +2% Damage from Mimic: +2% | Enemy stats: +20% EXP Bonus: 5% Orn Bonus: 3% Luck Bonus: 3% Proof of Melancholy Chance: 10% Ang. Gear Chance: 10% Healing: -9% |
| 2 | Enemy stats: +20% EXP Bonus: 3.2% Orn Bonus: 5.33% Luck Bonus: 3.2% Item Drop Quality Bonus: 0.01% Proof of Melancholy Chance: 2% Ang. Gear Chance: 0.4% Damage from Dragons: +3% Damage from Ancients: +3% Damage from Mimic: +3% | Enemy stats: +20% EXP Bonus: 5.33% Orn Bonus: 3.2% Luck Bonus: 3.2% Proof of Melancholy Chance: 1.5% Ang. Gear Chance: 0.8% Damage from Balor: +3% Damage from Animals: +3% Damage from Lyonesse: +3% | Enemy stats: +20% EXP Bonus: 3.2% Orn Bonus: 5.33% Luck Bonus: 3.2% Item Drop Quality Bonus: 0.01% Proof of Melancholy Chance: 2% Ang. Gear Chance: 0.4% 1HP Instead of Kill Chance: +1% | Enemy stats: +20% EXP Bonus: 5.33% Orn Bonus: 3.2% Luck Bonus: 3.2% Proof of Melancholy Chance: 1.5% Ang. Gear Chance: 0.8% Holy Damage: -4% Dark Damage: -4% Dragon Damage: -4% Arcane Damage: -3% |
| 3 | Enemy stats: +20% EXP Bonus: 3.4% Orn Bonus: 5.67% Luck Bonus: 3.4% Item Drop Quality Bonus: 0.01% Proof of Melancholy Chance: 2% Ang. Gear Chance: 0.4% Fire Damage: -4% Water Damage: -5% Lightning Damage: -2% Earthen Damage: -4% | Enemy stats: +20% EXP Bonus: 5.67% Orn Bonus: 3.4% Luck Bonus: 3.4% Proof of Melancholy Chance: 1.5% Ang. Gear Chance: 0.8% 1HP Instead of Kill Chance: +1% | Enemy stats: +20% EXP Bonus: 3.4% Orn Bonus: 5.67% Luck Bonus: 3.4% Item Drop Quality Bonus: 0.01% Proof of Melancholy Chance: 2% Ang. Gear Chance: 0.4% Holy Damage: -4% Dark Damage: -5% Dragon Damage: -2% Arcane Damage: -4% | Enemy stats: +20% EXP Bonus: 5.67% Orn Bonus: 3.4% Luck Bonus: 3.4% Proof of Melancholy Chance: 1.5% Ang. Gear Chance: 0.8% Permanent Status Effect Fade Chance: +1% |
| 4 | Enemy stats: +20% EXP Bonus: 3.6% Orn Bonus: 6% Luck Bonus: 3.6% Item Drop Quality Bonus: 0.01% Proof of Melancholy Chance: 2% Ang. Gear Chance: 0.4% Fire Damage: -3% Water Damage: -2% Lightning Damage: -4% Earthen Damage: -4% | Enemy stats: +20% EXP Bonus: 6% Orn Bonus: 3.6% Luck Bonus: 3.6% Proof of Melancholy Chance: 1.5% Ang. Gear Chance: 0.8% Berserk Encounters: +4% | Enemy stats: +20% EXP Bonus: 3.6% Orn Bonus: 6% Luck Bonus: 3.6% Item Drop Quality Bonus: 0.01% Proof of Melancholy Chance: 2% Ang. Gear Chance: 0.4% Holy Damage: -3% Dark Damage: -2% Dragon Damage: -4% Arcane Damage: -4% | Enemy stats: +20% EXP Bonus: 6% Orn Bonus: 3.6% Luck Bonus: 3.6% Proof of Melancholy Chance: 1.5% Ang. Gear Chance: 0.8% Crit Chance: -9% Crit Damage: -6% |
| 5 | Enemy stats: +20% EXP Bonus: 3.8% Orn Bonus: 6.33% Luck Bonus: 3.8% Item Drop Quality Bonus: 0.01% Proof of Melancholy Chance: 2% Ang. Gear Chance: 0.4% Crit Chance: -6% Crit Damage: -8% | Enemy stats: +20% EXP Bonus: 6.33% Orn Bonus: 3.8% Luck Bonus: 3.8% Proof of Melancholy Chance: 1.5% Ang. Gear Chance: 0.8% Berserk Encounters: +3% | Enemy stats: +20% EXP Bonus: 3.8% Orn Bonus: 6.33% Luck Bonus: 3.8% Item Drop Quality Bonus: 0.01% Proof of Melancholy Chance: 2% Ang. Gear Chance: 0.4% Permanent Status Effect Fade Chance: +1% | Enemy stats: +20% EXP Bonus: 6.33% Orn Bonus: 3.8% Luck Bonus: 3.8% Proof of Melancholy Chance: 1.5% Ang. Gear Chance: 0.8% Multi-target Damage: -5% |
| 6 | Enemy stats: +20% EXP Bonus: 4% Orn Bonus: 6.67% Luck Bonus: 4% Proof of Melancholy Chance: 2% Ang. Gear Chance: 0.4% Berserk Encounters: +3% Multi-target Damage: -4% | Enemy stats: +20% EXP Bonus: 6.67% Orn Bonus: 4% Luck Bonus: 4% Proof of Melancholy Chance: 1.5% Ang. Gear Chance: 0.8% Accuracy: -2% Damage from Dragons: +3% Damage from Ancients: +5% Damage from Mimic: +4% | Enemy stats: +20% EXP Bonus: 4% Orn Bonus: 6.67% Luck Bonus: 4% Proof of Melancholy Chance: 2% Ang. Gear Chance: 0.4% Crit Chance: -8% Crit Damage: -9% 1HP Instead of Kill Chance: +1% | Enemy stats: +20% EXP Bonus: 6.67% Orn Bonus: 4% Luck Bonus: 4% Proof of Melancholy Chance: 1.5% Ang. Gear Chance: 0.8% Damage from Balor: +5% Damage from Animals: +5% Damage from Lyonesse: +3% Fire Damage: -5% Water Damage: -4% Lightning Damage: -3% Earthen Damage: -3% |
 Agony
Agony
| Lv | Choice 1 | Choice 2 | Choice 3 | Choice 4 |
|---|---|---|---|---|
| 1 | Enemy stats: +18% Raid enraging: +2% Luck Bonus: 3% Item Drop Quality Bonus: 0.01% Proof of Agony Chance: 12% Ang. Gear Chance: 15% Status Effect Damage: +105% | Enemy stats: +16% Raid enraging: +3% Luck Bonus: 4% Proof of Agony Chance: 10% Ang. Gear Chance: 20% Follower Act: -2% | Enemy stats: +18% Raid enraging: +2% Luck Bonus: 3% Item Drop Quality Bonus: 0.01% Proof of Agony Chance: 12% Ang. Gear Chance: 15% Ward Absorption: -5% | Enemy stats: +16% Raid enraging: +3% Luck Bonus: 4% Proof of Agony Chance: 10% Ang. Gear Chance: 20% Healing: -2% |
| 2 | Enemy stats: +18% Raid enraging: +2% Luck Bonus: 3.2% Item Drop Quality Bonus: 0.01% Proof of Agony Chance: 2% Ang. Gear Chance: 1% Status Effect Damage: +107% | Enemy stats: +16% Raid enraging: +3% Luck Bonus: 4.27% Proof of Agony Chance: 1.5% Ang. Gear Chance: 2% Multi-target Damage: -3% | Enemy stats: +18% Raid enraging: +2% Luck Bonus: 3.2% Item Drop Quality Bonus: 0.01% Proof of Agony Chance: 2% Ang. Gear Chance: 1% Holy Damage: -2% Dark Damage: -4% Dragon Damage: -3% Arcane Damage: -4% | Enemy stats: +16% Raid enraging: +3% Luck Bonus: 4.27% Proof of Agony Chance: 1.5% Ang. Gear Chance: 2% Permanent Status Effect Fade Chance: +1% |
| 3 | Enemy stats: +18% Raid enraging: +2% Luck Bonus: 3.4% Item Drop Quality Bonus: 0.01% Proof of Agony Chance: 2% Ang. Gear Chance: 1% Follower Protect: -4% Summon Protection: -5% | Enemy stats: +16% Raid enraging: +3% Luck Bonus: 4.53% Proof of Agony Chance: 1.5% Ang. Gear Chance: 2% Accuracy: -1% | Enemy stats: +18% Raid enraging: +2% Luck Bonus: 3.4% Item Drop Quality Bonus: 0.01% Proof of Agony Chance: 2% Ang. Gear Chance: 1% Fire Damage: -5% Water Damage: -5% Lightning Damage: -2% Earthen Damage: -3% | Enemy stats: +16% Raid enraging: +3% Luck Bonus: 4.53% Proof of Agony Chance: 1.5% Ang. Gear Chance: 2% Multi-target Damage: -5% |
| 4 | Enemy stats: +18% Raid enraging: +2% Luck Bonus: 3.6% Proof of Agony Chance: 2% Ang. Gear Chance: 1% Fire Damage: -3% Water Damage: -5% Lightning Damage: -4% Earthen Damage: -3% | Enemy stats: +16% Raid enraging: +3% Luck Bonus: 4.8% Proof of Agony Chance: 1.5% Ang. Gear Chance: 2% Ult Defense: -11% | Enemy stats: +18% Raid enraging: +2% Luck Bonus: 3.6% Proof of Agony Chance: 2% Ang. Gear Chance: 1% Permanent Status Effect Fade Chance: +1% | Enemy stats: +16% Raid enraging: +3% Luck Bonus: 4.8% Proof of Agony Chance: 1.5% Ang. Gear Chance: 2% Status Effect Damage: +106% |
 Torment
| Lv | Choice 1 | Choice 2 | Choice 3 | Choice 4 |
|---|---|---|---|---|
| 1 | Enemy stats: +8% EXP Bonus: 3% Orn Bonus: 5% Tower Shard Bonus: 2% Proof of Torment Chance: 12% Ang. Gear Chance: 5% Permanent Status Effect Fade Chance: +1% | Enemy stats: +8% EXP Bonus: 5% Orn Bonus: 3% Tower Shard Bonus: 3% Proof of Torment Chance: 10% Ang. Gear Chance: 10% Holy Damage: -3% Dark Damage: -4% Dragon Damage: -4% Arcane Damage: -4% | Enemy stats: +8% EXP Bonus: 3% Orn Bonus: 5% Tower Shard Bonus: 2% Proof of Torment Chance: 12% Ang. Gear Chance: 5% Status Protection: -1% | Enemy stats: +8% EXP Bonus: 5% Orn Bonus: 3% Item Drop Quality Bonus: 0.01% Tower Shard Bonus: 3% Proof of Torment Chance: 10% Ang. Gear Chance: 10% Defend Power: -15% Healing: -9% |
| 2 | Enemy stats: +8% EXP Bonus: 3.2% Orn Bonus: 5.33% Tower Shard Bonus: 2% Proof of Torment Chance: 2% Ang. Gear Chance: 1% Accuracy: -1% | Enemy stats: +8% EXP Bonus: 5.33% Orn Bonus: 3.2% Tower Shard Bonus: 3% Proof of Torment Chance: 1.5% Ang. Gear Chance: 0.4% Fire Damage: -2% Water Damage: -5% Lightning Damage: -2% Earthen Damage: -4% | Enemy stats: +8% EXP Bonus: 3.2% Orn Bonus: 5.33% Tower Shard Bonus: 2% Proof of Torment Chance: 2% Ang. Gear Chance: 1% Damage from Dragons: +5% Damage from Ancients: +2% Damage from Mimic: +5% | Enemy stats: +8% EXP Bonus: 5.33% Orn Bonus: 3.2% Item Drop Quality Bonus: 0.01% Tower Shard Bonus: 3% Proof of Torment Chance: 1.5% Ang. Gear Chance: 0.4% 1HP Instead of Kill Chance: +1% |
| 3 | Enemy stats: +8% EXP Bonus: 3.4% Orn Bonus: 5.67% Tower Shard Bonus: 2% Proof of Torment Chance: 2% Ang. Gear Chance: 1% Permanent Status Effect Fade Chance: +1% | Enemy stats: +8% EXP Bonus: 5.67% Orn Bonus: 3.4% Tower Shard Bonus: 3% Proof of Torment Chance: 1.5% Ang. Gear Chance: 0.4% Damage from Undead: +3% Damage from Magic Foes: +5% Damage from Nothren: +4% | Enemy stats: +8% EXP Bonus: 3.4% Orn Bonus: 5.67% Tower Shard Bonus: 2% Proof of Torment Chance: 2% Ang. Gear Chance: 1% Accuracy: -1% | Enemy stats: +8% EXP Bonus: 5.67% Orn Bonus: 3.4% Item Drop Quality Bonus: 0.01% Tower Shard Bonus: 3% Proof of Torment Chance: 1.5% Ang. Gear Chance: 0.4% Berserk Encounters: +3% |
| 4 | Enemy stats: +8% EXP Bonus: 3.6% Orn Bonus: 6% Tower Shard Bonus: 2% Proof of Torment Chance: 2% Ang. Gear Chance: 1% Damage from Dragons: +5% Damage from Ancients: +5% Damage from Mimic: +4% | Enemy stats: +8% EXP Bonus: 6% Orn Bonus: 3.6% Tower Shard Bonus: 3% Proof of Torment Chance: 1.5% Ang. Gear Chance: 0.4% Permanent Status Effect Fade Chance: +1% | Enemy stats: +8% EXP Bonus: 3.6% Orn Bonus: 6% Tower Shard Bonus: 2% Proof of Torment Chance: 2% Ang. Gear Chance: 1% Accuracy: -2% | Enemy stats: +8% EXP Bonus: 6% Orn Bonus: 3.6% Item Drop Quality Bonus: 0.01% Tower Shard Bonus: 3% Proof of Torment Chance: 1.5% Ang. Gear Chance: 0.4% Berserk Encounters: +5% |
| 5 | Enemy stats: +8% EXP Bonus: 3.8% Orn Bonus: 6.33% Tower Shard Bonus: 2% Proof of Torment Chance: 2% Ang. Gear Chance: 1% Accuracy: -1% | Enemy stats: +8% EXP Bonus: 6.33% Orn Bonus: 3.8% Tower Shard Bonus: 3% Proof of Torment Chance: 1.5% Ang. Gear Chance: 0.4% Berserk Encounters: +4% | Enemy stats: +8% EXP Bonus: 3.8% Orn Bonus: 6.33% Tower Shard Bonus: 2% Proof of Torment Chance: 2% Ang. Gear Chance: 1% Status Protection: -1% | Enemy stats: +8% EXP Bonus: 6.33% Orn Bonus: 3.8% Item Drop Quality Bonus: 0.01% Tower Shard Bonus: 3% Proof of Torment Chance: 1.5% Ang. Gear Chance: 0.4% 1HP Instead of Kill Chance: +1% |
| 6 | Enemy stats: +8% EXP Bonus: 4% Orn Bonus: 6.67% Tower Shard Bonus: 2% Proof of Torment Chance: 2% Ang. Gear Chance: 1% Damage from Balor: +3% Damage from Animals: +3% Damage from Lyonesse: +3% 1HP Instead of Kill Chance: +1% | Enemy stats: +8% EXP Bonus: 6.67% Orn Bonus: 4% Tower Shard Bonus: 3% Proof of Torment Chance: 1.5% Ang. Gear Chance: 0.4% Fire Damage: -4% Water Damage: -2% Lightning Damage: -4% Earthen Damage: -3% Permanent Status Effect Fade Chance: +1% | Enemy stats: +8% EXP Bonus: 4% Orn Bonus: 6.67% Tower Shard Bonus: 2% Proof of Torment Chance: 2% Ang. Gear Chance: 1% Permanent Status Effect Fade Chance: +1% 1HP Instead of Kill Chance: +1% | Enemy stats: +8% EXP Bonus: 6.67% Orn Bonus: 4% Item Drop Quality Bonus: 0.01% Tower Shard Bonus: 3% Proof of Torment Chance: 1.5% Ang. Gear Chance: 0.4% 1HP Instead of Kill Chance: +1% Holy Damage: -2% Dark Damage: -3% Dragon Damage: -2% Arcane Damage: -4% |
Modifiers
Each Choice at each Path Level comes with multiple modifiers:
- Enemy stats: Each Level adds to the raw stats of enemy encountered. This modifier applies to the enemy's HP, Attack, Magic, Defence and Resistance. Contrary to Anguish 1.0, it does not apply to their Dexterity.
- Reward Modifiers: Each Level further increases the Rewards players get at the end of combats. They can be Proofs, Anguished Gear or boni to the XP, Gold, Orn, Luck or even Quality of items.
- Battle Modifiers: Diverse negative effects applied to the player for each battle.
The Path of Agony (Raids) also has an extra modifier: Raid Enraging. This increses the maximum Enrage % of the Raid and rescales it according to the HP% dealt. Furthermore, the Luck bonus for this Path also applies to Raid Rewards, unlike other Luck boni we know (Dowsing Rods, +Luck Gear, ...).
List of Battle Modifiers
This list is currently incomplete. Both the list and Range will be adjusted as data is gathered. See above the Choices that were recorded for each path.
| Modifier | Range | Notes |
|---|---|---|
| Crit Chance | -7-9% | |
| Crit Damage | -7-9% | |
| Follower Act | -2% | |
| Accuracy | -1% | |
| Ward Absorption | -5% | |
| Defend Power | -15% | |
| Healing | -9-10% | This applies to both Life Siphon and items. |
| Status Effect Damage | +105% | |
| Status Protection | -1% | |
| Damage from [Family] | +2-4% | |
| Permanent Status Effect Fade Chance | +1% | Gives a 1% chance that a non-temporary status effect fades* |
| [Element] Damage | -2-5% | |
| 1HP Instead of Kill Chance | +1% | Gives a "Second Chance" with low chance on enemies |
Each turn and for each status effect (independently), the game rolls whether the status effect fades. This implies that it is possible for multiple status effects to fade on a single turn.
This chance also rolls on negative status effects such as ![]() Cursed.
Cursed.
Rewards
Proofs
The Circle of Anguish has 4 different Proofs, one for each Path:
- Proof of Despair (World)
- Proof of Melancholy (Dungeons)
- Proof of Agony (Raids)
- Proof of Torment (Towers and Monuments)
Proofs are awarded when completing content for their given Path. The odds of receiving a Proof is displayed at the Circle of Anguish Guild.
- Path of Despair: A Proof may drop upon killing a Monster, Boss or Fishing Encounter of the player's Tier on the overworld.
- Path of Melancholy: A Proof may drop upon killing a Monster or Boss of the player's Tier in a Battle Dungeon or an Exploration Dungeon.
- Path of Agony: A Proof is guaranteed to drop upon winning a battle against a Raid.
More Proofs may drop in the Raid Rewards screen.
These Proofs are not locked behind any Tier restriction (e.g.: a T10 player can get Proofs from a T6 Raid).
- Path of Torment: A Proof may drop upon killing a Monster or Boss of the player's Tier in a Tower or a Monument.
In Horde content, the Proof drop rolls for each eligible enemy.
In the last floor of a Horde Battle Dungeon, it is possible to drop up to 5 ![]() Proofs of Melancholy.
Proofs of Melancholy.
Anguished Gear
Anguished Gear are upgraded versions of items intended to be used in Anguish content (Path Level >= 1). Any Ornate Gear (aside from Accessories and Adornments) drop has a chance to be granted an "Anguished Level". That Level depends on the Anguish Level of the battle that dropped the item. The item Anguished Level is at worst 2 Levels lower than the current Path Anguish Level (e.g.: at Path Anguish Level 8, Anguished 6, 7 or 8 Gear can be found).
Anguished pieces of Gear have slightly higher stats than non-Anguished pieces of the same quality when used in Anguish content.
The stats are increased by 3% per Anguished Level on the item.
This increase applies to base stats (![]()
![]()
![]()
![]() ) and to Follower / Summon stats.
) and to Follower / Summon stats.
\[ \text{anguished-stat} = \text{base-stat} * (1 + 0.03 * \text{gear-anguished-level}) \]
However, if an Anguished item is equipped in a lower Anguished Level, the anguished stats are scaled down to the current Anguish Level. For instance, an Anguished Level 5 item equipped in an Anguish Level 2 content will only have 6% more stats, as opposed to the 15% it would have at Anguish Level 5. The anguished stats can be expressed as :
\[ \text{anguished-stat} = \text{base-stat} * (1 + 0.03 * \text{min}(\text{gear-anguished-level}, \text{anguish-level})) \]
In addition to the increased stats, they may also have one added affix or extra stat that further enhances it.
An Anguished item drop always has one, but items made Anguished through the use of ![]() Demonworking Tools (from Anguished Level 0 to 1) will not.
For them, an
Demonworking Tools (from Anguished Level 0 to 1) will not.
For them, an ![]() Anguished Crucible has to be used.
Anguished Crucible has to be used.
List of Anguished Gear Affixes & Extra stats
| Bonus | Min | Max | |||||
|---|---|---|---|---|---|---|---|
| HP (head) | 200 | 300 | x | ||||
| HP (torso) | 500 | 1000 | x | ||||
| Mana | 200 | 300 | x | ||||
| Dexterity | 100 | 150 | x | x | x | x | x |
| Foresight | 50 | 100 | x | ||||
| Crit Chance | 5% | 10% | x | ||||
| Crit Damage | 4% | 10% | x | ||||
| Accuracy (head) | 4% | 7% | x | ||||
| Accuracy (torso) | 1% | 2% | x | ||||
| Accuracy (legs) | 2% | 4% | x | ||||
| Pet Act | 3% | 7% | x | ||||
| Faction Damage | 5% | 10% | x | ||||
| Damage Limit Break | 50% | 100% | x | ||||
| Spell Casting Damage | -12% | -19% | x | ||||
| Def/Res Penetration | 5% | 10% | x | ||||
| Two-Handed Power | 8% | 15% | x | ||||
| Mana Reduction | 5% | 9% | x | ||||
| Mana Recovery | -96% | -99% | x | ||||
| Life Siphon | 1% | 2% | x | ||||
| Ward Recovery | 1% | 3% | x | x | x | ||
| Ward Start Turns | 1 | 3 | x | ||||
| Defend Power | 10% | 20% | x | ||||
| Ult Defense | 13% | 30% | x | ||||
| Status Protection | 3% | 7% | x | ||||
| Buff Duration | 2% | 5% | x | ||||
| Godforge Chance | 1% | 1% | x |
Guild Shop
Items
Outside of cosmetics, consumables and materials, the Circle of Anguish Guild Shop sells items affecting Anguish play: the ![]() Anguished Pathspur,
Anguished Pathspur, ![]() Anguished Crucible and
Anguished Crucible and ![]() Demonworking Tools.
Demonworking Tools.
The ![]() Anguished Pathspur allows one to reset the Choices that were made for a Path of Anguish.
They reset all levels of a single Path.
They can be used from the "View Path" menu of the Circle of Anguish.
Anguished Pathspur allows one to reset the Choices that were made for a Path of Anguish.
They reset all levels of a single Path.
They can be used from the "View Path" menu of the Circle of Anguish.
The ![]() Anguished Crucible allows you to (re)roll the bonus given to an Anguished Gear.
If the piece of Gear does not have a bonus, then the Crucible will grant it one.
The new bonus cannot be the same as the current one.
However, using another Crucible may give a previous bonus, even with a different value.
Anguished Crucible allows you to (re)roll the bonus given to an Anguished Gear.
If the piece of Gear does not have a bonus, then the Crucible will grant it one.
The new bonus cannot be the same as the current one.
However, using another Crucible may give a previous bonus, even with a different value.
The ![]() Demonworking Tools allows one to increase the Anguished Level of a piece of equipment.
The piece on which to apply the Demonworking Tools must at least be Masterforged.
Upon using, the Tools will increase the piece's Anguished Level by 1 and reset its level to 10.
In order to use another Tools on it, the item has to be at least Masterforged.
If used on a non-Anguished piece, the Tools will set it to Anguished Level 1 without an extra affix or stat.
An
Demonworking Tools allows one to increase the Anguished Level of a piece of equipment.
The piece on which to apply the Demonworking Tools must at least be Masterforged.
Upon using, the Tools will increase the piece's Anguished Level by 1 and reset its level to 10.
In order to use another Tools on it, the item has to be at least Masterforged.
If used on a non-Anguished piece, the Tools will set it to Anguished Level 1 without an extra affix or stat.
An ![]() Anguished Crucible will have to be used to assign one.
Anguished Crucible will have to be used to assign one.
Cost of Anguish items
The currency for each item (![]()
![]()
![]() ) is set daily, being Proofs of any of the 4 Paths.
Every player will see items priced with the same currencies on a given (localized) day.
) is set daily, being Proofs of any of the 4 Paths.
Every player will see items priced with the same currencies on a given (localized) day.
The cost for each item is:
 Anguished Pathspur: 20
 Anguished Crucible: 50
 Demonworking Tools: 65
Materials
The Circle of Anguish sells 8 materials each day, 2 for each Proof.
Every player will the same materials for the same cost (amount and currency) on a given (localized) day.
Their pricing is the same as Anguish 1.0, but using the new proofs rather than ![]() Proofs of Anguish.
Proofs of Anguish.
The cost of a pile of materials is not dependent on the Path Level, but on the Tier and Rarity of the material:
\[ \text{materials-cost} = \lfloor \text{quantity} * (\text{material-tier} * 0.1 + \text{rarity-cost}) \rfloor \]
where
\[ \text{rarity} = \begin{cases} \text{Common} \Rightarrow 0 \\ \text{Superior} \Rightarrow 0.05 \\ \text{Famed} \Rightarrow 0.1 \\ \text{Legendary} \Rightarrow 0.15 \end{cases} \]
Party play
Most of the Anguish content works as one would expect. Here is a breakdown of known interactions for each Path:
- Path of Despair (World)
- ?
- Path of Melancholy (Dungeons)
- The Anguish Level is set to that of the player with the lowest active Anguish Level (not max unlocked Level).
- The Choices and Battle Modifiers that apply are those of the leader.
- Proofs of Melancholy are rolled individually.
- Path of Agony (Raids)
- The Anguish Level that applies is that of the Raid summoner at the time of summon.
- The Choices and Battle Modifiers that apply are those of the battle Leader.
- A player cannot start a raid above its max Agony Level.
- A player can join a raid up to its max Path Level (the max of all 4 paths).
- Every member in the battle in which the Raid was killed gets a guaranteed Proof of Agony.
- Every player who damaged the Raid is eligible for Proofs of Agony on the Rewards screen.
- Path of Torment (Towers, Monuments)
- No party play.
How does it work for the Path of Despair?
What dictates whether and how many Proofs of Agony drop? wrt damage dealt
Can someone get Anguished Gear further than their max unlocked Anguish?
A
AFC
The Arisen Fey Crowsong, a onehanded weapon with notably high hybrid stats and pet act.
Affix
Modifiers to Gear which aren't directly stats. Examples of affixes are Parapet, +Fire Damage, +Ward Turns, Collateral Damage, ...
AL
Ascension Level.
AR
Ally Request, an ask for becoming allied (friends) in-game. This is required for party invites.
ASG
The T10 Arisen Spiritgarm. It usually refers to the follower rather than the monster.
B
BB
The Bestial Bond ability of valhallan classes. BB1 refers to Bestial Bond, BB2 to Bestial Bond II and BB3 to Bestial Bond III.
BD
The Beast Den dungeon.
BG
The Battlegrounds dungeon.
BiS
Best-in-slot, the best piece of equipment for the given slot.
Bluelining
Staying low MP ("blue" bar) to maximize abilities such as Heretic's Iconoclast.
BoF
This most of the times refers to the T9 Blade of Finesse specialization. It may also refer to the Blade of Finesse guild and its PvP fights.
BoG
The Band of Gods. "OBoG" is sometimes used to refer to an Ornate BoG.
BP
The Blood Pact spell (BP2, BP3).
Buff
An alteration augmenting something's power.
C
CJO
The Court Jester's Outfit, a T10 chestpiece increasing Gold and Orn gains.
CG
- The T9 Crimson Gazer. It usually refers to the Summoner Spell.
- The Conqueror's Guild
CP
The Chaos Portal dungeon.
CS
The Chained Shield skill.
D
DAra
The Deity Ara T10 celestial class.
DB
The Divine Bastion spell. DB2 refers to the Divine Bastion II spell.
DC
The Deific Channel spell.
"DC" is also sometimes used to refer to the ![]() T. All↑↑↑ status effect.
T. All↑↑↑ status effect.
DF
Demonforge / Demonforging, the 12th upgrade level to equipment.
DoF
The T5 Disciple of Finesse specialization.
DM
The T3 Diluted Mnemonic consumable.
DR
The Dragon Roost dungeon.
DUrsa
The Deity Ursa T10 celestial class.
E
Exotic
Items dropped from enemies belonging to World Events. They are thus not available year-round.
F
FEE
The Finesse Enchanted Epee, the best-in-slot Towerfall follower builds weapon.
FS
Foresight.
FSC
The Fey Surtr's Cuirass, a good T10 chestpiece.
FYC
The Fey Yeti Coat, a good T9 chestpiece.
G
GF
- Godforge / Godforging, the 13th upgrade level to equipment.
- The Goblin Fortress dungeon.
GilgaH / GilgaHerc / GHerc
The Gilgamesh Hercules T10 celestial class.
GM
The Great Meditation (GMII) spell, granting the T.Mag ↑↑↑ effect and usually applied via the (Arisen) Aaru Robe.
GS
The Grand Summoner T10 class.
GSA
The Grand Summoner Auriga T10 celestial class.
GSH
The Grand Summoner Hydrus T10 celestial class.
H
HoA
Hero of Aethric (link to the game page).
HoC
The Heart of Change, a consumable allowing one to reverse its ascensions on a class. HoC'ing / HoC'd is sometimes used to refer to the use of a HoC (e.g.: "I've HoC'd to Deity" means "I've used a HoC and used the resources I got to ascend Deity").
HS
The Horizontal Slash skill (HS2, HS3).
Hybrid
Any mechanic in the game allowing one to use both their attack and magic stats in the damage formula. See the dedicated section for details.
I
IRL
In Real Life, referring to things outside of the game.
J
JoC
The Jewel of Creation, a highly sought-after Armor adornment increasing most stats.
K
K-
The K- prefix usually means Kingdom (e.g.: KGold, KGauntlet, KOrn, KRaid).
KGauntlet
Kingdom Gauntlet (book section).
KGold
Kingdom Gold, a Kingdom currency earned through members' fights used to start Kingdom Gauntlets.
KOrn
Kingdom Orns, a Kingdom currency earned mostly through Kingdom Gauntlets and Kingdom Wars used to start Kingdom Raids.
KRaid
Kingdom Raid.
M
M1 / M2
Former names for (respectively) the stat multiplier and damage multiplier of skills and spells.
Maincord
The official ("main") Orna Discord server (invite link).
MF
Masterforge / Masterforging, the 11th upgrade level to equipment.
Mirrorring
An exchange of Raids in which 2 players hit their own Raid and that of the other for 50% damage each. This maximizes the amount of common drops per raid summonned.
MM
The Mimics Mischief spell, learned by the T5 Druid class. Grants Mag↑↑/Att↑↑ while potentially decreasing other stats or causing debuffs.
N
Nag
Naggeneen, a character from the Mischievous Clurichauns event. He is a raid (arisen), follower (arisen) and has some items to his name (e.g.: Belt, Hat, Brew).
Newsletter
Teaser about upcoming events and changes that's released to all tier 2 and above Patreons at the end of each month.
NF / NFS
Northern Forge (Studios), the studio behind Orna.
O
OL
The Orna Legends Discord server (invite link).
ONC
An Old Nothren Crown. "OONC" is sometimes used to refer to an Ornate ONC.
ORN
The Orna Representative Network, a group of players that gathers feedback from the community and frequently discusses it with the Northern Forge team.
OS
- Othersouls, lower-tier fighters in the Conqueror's guild for higher-tier players.
- One shot, killing in a single turn.
OT
Origin Town, the area one sets as their origin place.
P
Parapet
Amity bonus / gear effect that may prevent a player from taking damage when attacked. For example see Ymir Cliffside Cuirass
Patreon
A third-party platform on which you can support Northern Forge further (link to their page).
PoF
The Paths of Fomoria event: PoF Wintara, PoF Nocturna, PoF Sumner, PoF Autumna.
Purplelining
Combining bluelining and redlining. Staying both low HP and low MP to maximize abilities such as Realmshifter's Resurgence and Heretic's Iconoclast.
Q
Qat
The T9 Qatvanga or the T10 Arisen Qatvanga, a two-handed Magic Archistaff with the Despair AoE ability.
R
Redlining
Staying low HP ("red" bar) to maximize abilities such as Realmshifter's Resurgence.
Riftbreak
Localized events that spawn on the hour randomly in the world in which some monster spawns are boosted. They offer a reward to players who complete its goal.
RoR
The Ring of Restraint, an item used to prevent a character from levelling up.
RS
The Realmshifter T10 class.
S
Sanding
Hitting a Raid for minimal damage (2 at best; <1000 is considered acceptable) to enter the Raid drop pool while not taking much away from the Raid owner. See the dedicated section for details.
Seq
The T9 sequencer specialization.
SGS
The Spiked GreatShield, the currently best-in-slot Spiked Shield offhand.
Shuffling
Reshuffling a players kingdom gauntlet monster to another player. See this section for more details.
Slot
An adornment spot on a piece of equipment. "Slots" usually refers to the number of adornment slots.
SoW
The T9 Symbol of War Weapon Adornment.
Spoofing
Spoofing is using an utility software to change one's GPS location. These softwares are forbidden by the Terms of Service.
SS
The Spiked Shield skill (SS2, SS3).
Swash
A playstyle where the player minimizes its Defence to max out its Attack. Swashy playstyle uses the T7 Swashbuckler or the T9 Blade of Finesse specialization for their Swashbuckle ability.
T
T1-11
Tier 1-11. One starts at Tier 1 and gains a new tier every 25 levels.
Terms of Service (ToS) / Terms of Use (ToU)
Terms of Service are the legal terms players agree to when playing the game. A player breaking the ToS may get permanently banned. They can be viewed on Northern Forge Studio's website.
Notable ToS violations are:
- Account sharing
- Using third-party software to interact with the game
- GPS spoofing
TMM
The Mightiest Mimic Raid. TMM Head refers to the Mightiest Mimic Head, its headpiece drop increasing Gold, Orn, XP gains as well as Luck.
U
US
The T10 Ultimastrikes skill.
UW
The Underworld Portal dungeon.
V
VD
View Distance, how far your character can see on the map.
VotG
The Valley of the Gods dungeon.
VSS
The Very Scary Skeleton. It usually refers to the T9 follower.
W
WoO
The Ward of Ortanite spell.
WRB
World Raid Boss, a Raid on the overworld (book section)
WV
Wayvessel, a building that can be built in one's Origin Town allowing travel to party members' Wayvessels.
Y
YBF
The Ymir Brilliant Feathers, a twohanded weapon with the most adornment slots and faction bonus.
Contributors, credits and thanks
This project would not have been complete without the help and support of many people in the community. From those who spent time figuring out the mechanics to those who directly contributed to the writing of this book, it would be impossible to thank everyone individually, so we thank to the community as a whole.
Furthermore, we would like to more specifically address our thanks to the following people who directly contributed to this book:
- BigYoshi for numerous contributions to the Glossary.
- jiujitsupatricia for contributing the Dungeons page and adding information to the WRB page.
- Knight411 for sharing his knowledge and his Dungeon Floors per tier chart.
Orna: The GPS RPG is the property of Northern Forge Studios Inc. Rights for icons and images of in-game elements belong to them.
Gear boni dual-wield plot
The code for the plot for gear boni when dual-wielding is the following:
import matplotlib.pyplot as plt
import numpy as np

def f(x):
    return (1 + 0.65 * x)**2 / (1 + x)

plt.style.use({
    'figure.facecolor': '#0f1419',
    'text.color': '#ffffff',
    'axes.facecolor': '#0f1419',
    'axes.edgecolor': '#ffffff',
    'axes.labelcolor': '#ffffff',
    'xtick.color': '#ffffff',
    'xtick.labelcolor': '#ffffff',
    'ytick.color': '#ffffff',
    'ytick.labelcolor': '#ffffff',
})

x = np.linspace(0, 1, 10000)
y = f(x)

fig, ax = plt.subplots()
fig.set_size_inches(10, 5)
ax.plot(x, y)
ax.set_title('Ratio of boni when dual-wielding over single-wielding', size=14)
plt.savefig('boni_dual_wield_ratio_plot.svg', dpi=100)